Importing into Visual Studio Community 2015
- Getting started
- Building a simple Challenge solution (with Boost headers and Google Test)
- Linking in a Boost library
- Using the Hunspell library
- Using the Crypto++ library
- Using the OpenSSL library
- You're done!
For maximum portability across different UNIX-like systems, this project is built with the GCC toolchain and uses GNU Make as a build orchestrator. For neutrality across developer preferences, it also does not assume the use of any specific editor or IDE (e.g. Eclipse, XCode, Visual Studio) but contains only the editor/IDE-agnostic source files -- without any OS- or machine-specific include path settings.
This does not mean an IDE cannot be used for development, but simply that some extra steps must be followed to import it into an IDE. Here I will describe the steps needed for Microsoft Visual Studio Community 2015 (with notes for later versions). This will set up a separate build environment using Microsoft Visual C++, giving you full access to its awesome debugging experience.
-
Make sure the repository has been cloned to somewhere on your computer. (You may use the Git or GitHub plugin inside Visual Studio to do this, although any Git client will do -- e.g. Git for Windows, TortoiseGit, etc.) You will also need to download the Boost libraries and clone the Google Test repository somewhere in your computer.
-
Make sure you have the EditorConfig plugin installed in Tools -> Extensions and Updates. If not, install it! (Restart required.) This will help you conform to various project-specific editor settings like indentation, charset, and line length.

UPDATE: Visual Studio 2017 does not need the EditorConfig plugin as it has the functionality built in.
-
Create a new Win32 Console Application project, specifying the inner Challenge-specific directory as the Location. In the Win32 Application Wizard, go to the Application Settings page and check the Empty project checkbox before clicking Finish.


NOTE: The Solution is created in a subdirectory of your Challenge directory. If you selected the Create directory for solution option, then the C++ Project will be located inside another directory level under the Solution. The screenshots here assume that you did not select that option.
UPDATE: In Visual Studio 2017 Update 15.3 the project template and wizard have been renamed to Windows Console Application template and Windows Desktop Project wizard respectively. You need to use the latter to have the "Empty Project" option, to avoid inheriting any auto-generated files.
-
In the Solution Explorer, right-click the Source Files folder and use the Add -> Existing Item option to add the source files listed in the
SRCS=variable of theGNUmakefile. For IntelliSense to work, also enlist their corresponding header files under the Header Files folder.
-
In the Solution Explorer, right-click the Solution entry and use the Add -> Existing Project option to open the existing
gtest.vcprojandgtest_main.vcprojproject files under${GTEST_DIR}\googletest\msvc(where${GTEST_DIR}is the root directory of your Google Test repository clone). You may need to perform a one-way upgrade here.

UPDATE: As of commit 88269cd36 the Visual Studio projects of Google Test have been moved into a
2010subdirectory inside${GTEST_DIR}\googletest\msvc. They also emit their outputs (.libfiles) into peculiarly-named directories, so to find them at link-time your Challenge project will need the Use Library Dependency Inputs option enabled (this is done below when linking in the Hunspell library, as an example).UPDATE: As of commit 60a6d5fc34 the Visual Studio projects of Google Test have been removed. So now you'll have to extract them from the Git history using:
git checkout 60a6d5fc34~1 -- googletest/msvc. -
Enlist the now-opened
gtestandgtest_mainprojects under References of your Challenge-specific project.
-
Clone and prepare the Boost project for header-only use by running the following commands in a x64 Native Tools Command Prompt for VS 20xx window:
> git clone https://github.com/boostorg/boost.git
> cd boost
> git submodule update --init --recursive
> bootstrap.bat msvc
> b2 headers
We will refer to this directory as
${BOOST_DIR}from now on. -
Right-click your Challenge project and go to Properties. There:
-
At the top of the dialog box, choose "All Configurations" in the Configuration dropdown and "All Platforms" in the Platform dropdown.
-
Then go to the Configuration Properties -> C/C++ -> General page, and in Additional Include Directories enlist:
${GTEST_DIR}\googletest\include${BOOST_DIR}- any other Challenge directories listed in a
VPATHvariable in theGNUmakefileof this Challenge.

-
Click OK to save your changes and close the Properties dialog box.
-
-
The upgraded
gtestandgtest_mainprojects have a bug in the Debug configuration -- the Librarian is configured to emit$(OutDir)$(ProjectName)d.libbut the overall target file path is still expected to be$(OutDir)$(ProjectName).lib. This causes a MSB8012 warning. To fix this, do the following in each of them:- Right-click the project and go to Properties.
- Choose "Debug" in the Configuration dropdown at the top of the dialog box.
- In the Configuration Properties -> General page change the Target Name from
$(ProjectName)to$(ProjectName)d.
- Click OK to save your changes and close the Properties dialog box.
-
By default, a Visual C++ project uses a DLL version of the Runtime Library. However, since the
gtestandgtest_mainprojects already specify the use of a statically-linked Runtime Library, the default setting for the Challenge project would cause a LNK2038 error. To fix this, do the following:- Right-click your Challenge project and go to Properties.
- At the top of the dialog box, choose "Debug" in the Configuration dropdown and "All Platforms" in the Platform dropdown.
- In the Configuration Properties -> C/C++ -> Code Generation page, change the Runtime Library option to "Multi-threaded Debug (/MTd)".

- Stay in the same page, and change the Configuration dropdown at the top of the dialog box to "Release". Click Yes to the confirmation popup to save the Debug configuration at this point.
- Change the Runtime Library option to "Multi-threaded (/MT)".
- Click OK to save your change to the Release configuration and exit the Properties dialog box.
-
On Windows, the Google Test library by default (since v1.6) silences most Structured Exception Handling (SEH) exceptions. The C/C++
assert()macro is implemented in Windows using SEH exceptions, and therefore assertion failures are handled internally by the Google Test framework -- preventing a debugger from seeing them. To allow assertion failures break into the Visual Studio debugger, specify the--gtest_catch_exceptions=0command-line option as follows:- Right-click your Challenge project and go to Properties.
- At the top of the dialog box, choose "All Configurations" in the Configuration dropdown and "All Platforms" in the Platform dropdown.
- In the Configuration Properties -> Debugging page, add
--gtest_catch_exceptions=0to the Command Arguments option.
- Click OK to save your changes and close the Properties dialog box.
If the Challenge needs to link in a Boost library, do the following:
-
Build that Boost library with:
-
the msvc toolchain
NOTE: As of writing, if you are using Visual Studio 2017 then you need to also specify the version of the toolchain like msvc-14.1. Refer to Support VS2017 for updates on the fix.
-
the versioned layout
-
multi-threaded mode
-
static C++ runtime
-
the debug or release variant according to your current Visual Studio project configuration
Also, to same time and disk space you can restrict the build to only specific libraries using --with-LIBRARY.
For example:
b2 --layout=versioned toolset=msvc variant=debug threading=multi runtime-link=static --with-system --with-date_time --with-regex.
NOTE: Refer to the Boost Getting Started on Windows guide for more details on these build options.
-
-
Right-click your Challenge project and go to Properties.
-
At the top of the dialog box, choose "All Configurations" in the Configuration dropdown and "All Platforms" in the Platform dropdown.
-
Go to the Configuration Properties -> Linker -> General page, and under Additional Library Directories enlist the
${BOOST_DIR}\stage\libdirectory.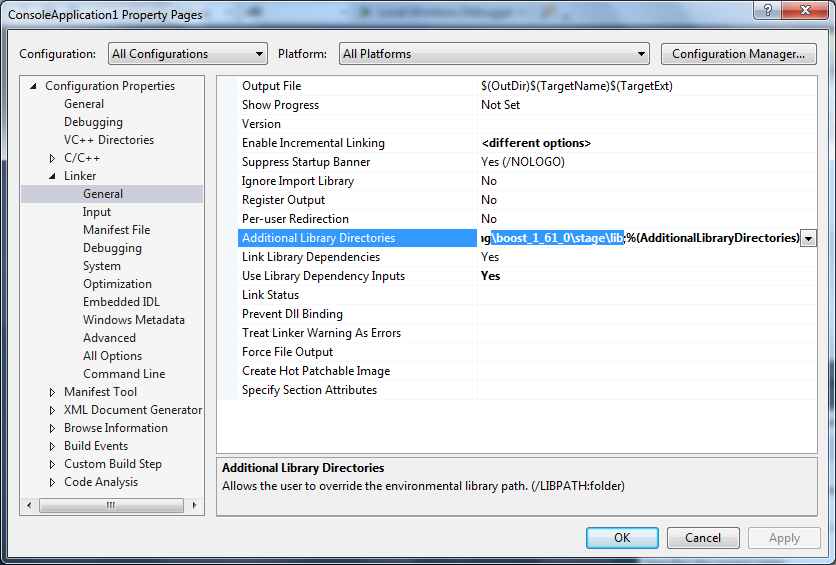
-
Click OK to save the changes and exit the dialog box.
If the Challenge needs to link in the Hunspell library, do the following:
-
In the Solution Explorer, right-click the Solution entry and use the Add -> Existing Project option to open the
${HUNSPELL_DIR}\src\win_api\libhunspell.vcprojproject file. (You may be prompted to carry out a one-time conversion at this point.)

UPDATE: This project file was removed in December 2016, so you will need to extract the project file from an earlier commit (using
git checkout 442f652a~1 -- src/win_api/libhunspell.vcproj, etc.). -
Retarget the toolset and Windows SDK version as follows:
- Right-click the libhunspell project and go to Properties.
- At the top of the dialog box, switch the Configuration to "All Configurations" and the Platform to "All Platforms".
- Go to the Configuration Properties -> General page and change both Windows SDK Version and Platform Toolset to "<inherit from parent or project defaults>".
- Click OK to save changes and close the Properties dialog.
- Right-click the libhunspell project again and choose Retarget Projects. Select the latest Windows SDK version and MSVC toolset version you have available, and click OK to migrate the project.
-
Enlist the now-opened
libhunspellproject under References of your Challenge-specific project.
-
Go to the Properties for your Challenge-specific project, and under Configuration Properties -> C/C++ -> General enlist the
${HUNSPELL_DIR}\src\hunspelldirectory in Additional Include Directories for all configurations and platforms. -
Also in the Properties page, under Configuration Properties -> Debugging choose Local Windows Debugger in the top-level dropdown. Then in Environment specify the
HUNSPELL_AFFIX_PATHandHUNSPELL_DICT_PATHenvironment variables with values (i.e. the pathnames to the.affand.dicfiles).
-
The default configuration of
libhunspellis to produce a DLL, but we'll use the static library configuration to avoid having to specify the DLL path at run-time. To accomplish this, go to the Configuration Manager and make sure that the "Debug" configuration oflibhunspellis selected for the "Debug" configuration of the Solution, and that the "Release" configuration oflibhunspellis selected for the "Release" configuration of the Solution.

-
The
libhunspellproject is configured to emit its output to a subdirectory of the usual configuration-specific output directory. This leads to our Challenge-specific project being unable to locate thelibhunspell.libfile to link against, resulting in LNK2019 errors. To remedy this, go to the Properties for your Challenge project and under Configuration Properties -> Linker -> General enable the Use Library Dependency Inputs option for all configurations and platforms.
If the Challenge needs to link in the Crypto++ library, do the following:
-
In the Solution Explorer, right-click the Solution entry and use the Add -> Existing Project option to open the
${CRYPTOPP_DIR}\cryptlib.vcxprojproject file.

-
Enlist the now-opened
cryptlibproject under References of your Challenge-specific project.
-
Go to the Properties for your Challenge-specific project, and under Configuration Properties -> C/C++ -> General enlist the
${CRYPTOPP_DIR}directory in Additional Include Directories for all configurations and platforms.
-
The
cryptlibproject is configured to build with the Build Tools for Microsoft Visual Studio 10.0, which would normally not be present on your system unless you also have that earlier version installed. This causes a MSB8020 error. To fix this, right-click the cryptlib project and use the Upgrade VC++ Compiler and Libraries option to point it at your installed toolset. (You will get a confirmation popup as below.)
-
In some cases the
cryptlibproject will fail to build with some unresolved external symbols (_MASM_RRA_GenerateBlockand_MASM_RSA_GenerateBlock), resulting in LNK2001 errors. This problem seems to be caused by therdrand.cpptranslation unit, and it can be worked around by excluding that file from the "Debug" and "Release" build configurations.
-
In some other cases (especially in x64 mode) the project will encounter more unresolved symbols (
Baseline_Add,Baseline_Sub, etc.). These are caused by a bug in the project file, where the x64-specific.asmfiles are assembled into a subdirectory that is registered as a relative pathname, which can't later be found when the Challenge-specific project tries to find it from another working directory. It can be fixed by:- Prepend
$(ProjectDir)to the Output Directory and Intermediate Directory settings incryptlibproject properties for all configurations. Doing this makes them absolute paths. - In the Custom Build Tool page, set the Add Outputs to Item Type option to Object, again for all configurations. This is needed because of our "Use Library Dependency Inputs" setting in the Challenge-specific project, so that the generated
.objfiles are reconsidered when building the application. - In the Solution Explorer, right-click
adhoc.cpp.proto(under the Miscellaneous filter) and go to its Properties. In the General page, enable the Excluded from Build option for all configurations. This is needed because the output of the Custom Build of this file is a generated.cppfile that seems to be empty, and it causes confusion if it is identified as an Object file as above.
- Prepend
-
If you try to run the output program on an earlier version of Windows (e.g. Windows 7) compared to the version of the Windows SDK that it was built against (e.g. v8.1), then you may encounter a load-time error due to recent functions not being available on your platform. You should define the
_WIN32_WINNTpreprocessor symbol to an appropriate documented value in Configuration Properties -> C/C++ -> Preprocessor for all build configurations.
To build OpenSSL for Windows, according to its INSTALL and NOTES.WIN files you'll need to install a Perl 5 distribution like Strawberry Perl or ActivePerl. Once that is done, follow these steps:
-
For a 64-bit release build, open a x64 Native Tools Command Prompt for VS 20xx window, change to the directory where you cloned OpenSSL (we'll call it
${OPENSSL_DIR}from now on) and run:perl Configure VC-WIN64A-masm --prefix=%CD%nmake

-
Alternatively, for a 32-bit release build, open a x86 Native Tools Command Prompt for VS 20xx window instead. Go to
${OPENSSL_DIR}and run:perl Configure VC-WIN32 --prefix=%CD% no-asmnmake
NOTE: To get a debug build, add --debug to the perl Configure ... command in both cases.
-
Go to the Properties for your Challenge-specific project, and:
- Under Configuration Properties -> C/C++ -> General enlist the
${OPENSSL_DIR}\includedirectory in Additional Include Directories for all configurations and platforms. - Under Configuration Properties -> Linker -> General enlist
${OPENSSL_DIR}in Additional Library Directories. - Then go to the Linker -> Input page and enlist
libcrypto.libandlibssl.libunder Additional Dependencies. - Finally in the Debugging page, either enlist
PATH=${OPENSSL_DIR}in Environment or change Working Directory to${OPENSSL_DIR}. This is so that the DLL loader can findlibcrypto-3.dlland its dependencies.
- Under Configuration Properties -> C/C++ -> General enlist the
-
OpenSSL has recently deprecated several old APIs in their "master" branch unless the
--apiconfiguration option is used to target a release version. This impacts Boost.Asio with a C4996 warning, so we need to disable it for ourdownload_file_over_https.cppsource file in its Configuration Properties -> C/C++ -> Advanced property page as described.
That's it, you should be up and running now!

