01 Quickstart guide
The simplest way to set up the backend is to use Docker. This guide will use Debian as the host operating system. Installing the backend on operating systems without Docker support is not covered by this quickstart guide, but manual installation is of course possible, and will be covered in the wiki.
You just need to download and extract backend-bundle.zip, and use docker-compose
to set up all the components:
$ sudo apt install docker-compose
$ wget https://github.com/sghctoma/sst/releases/download/v0.4.0-alpha/backend-bundle.zip -O /tmp/backend-bundle.zip
$ sudo unzip -d /opt/sst /tmp/backend-bundle.zip
$ cd /opt/sst
Before starting up the whole thing, you might want to configure Caddy, which is
an HTTP server that is basically just used as a TLS termination proxy. With the
default configuration (at /opt/sst/caddy/Caddyfile), it uses self-signed
certificates. If you are planning to put the backend on the internet, you
should modify the config to include your domain name, so that Caddy can
automatically pull Let's Encrypt certificates. The modified config file will
look something like this:
{
	admin off
}
sst.sghctoma.com {
	handle {
		reverse_proxy dashboard:5000
	}
	log {
		output file /data/caddy-access.log
		format json
	}
}
When you are done editing the Caddyfile, you can start the backend:
$ sudo docker-compose up -dAn initial password will be created and printed in the logs for the admin user.
The -d in the command above causes the containers to run in the background, so
you need to print the logs out to see this password:
$ sudo docker logs sst_dashboard_1You should look for the line that starts with GENERATED INITIAL ACCOUNT in the
output.
Please refer to the 02 Data Acquisition Unit
wiki page on building the hardware and firmware. When everything is ready, you
should change the configuration (CONFIG file in the root of the MicroSD
card) to include credentials for your WiFi network, and backend server
address. It should look like something like this:
SSID=sst
PSK=changemeplease
NTP_SERVER=pool.ntp.org
SST_SERVER=sst.sghctoma.com
SST_SERVER_PORT=557
COUNTRY=HU
TIMEZONE=Europe/Budapest
When it's done, turn the device on. The first time you do this, you need to calibrate the sensor(s):
- When the unit displays
CAL_EXP, extend both the shock and fork (e.g. lift the bike up) and press the left button. - The unit will now display
CAL_COMP. Compress both suspensions (e.g. sit on the bike), and press the left button again. This concludes the sensor calibration.
After this, you can synchronize the unit's clock by starting the TCP server (long
right press). When the display shows the SERVER ON message, you can close the
server with a short right press.
If you plan to use the web-based dashboard, you will need to record the device's unique ID. To do this, record a short session (short left press, and after a few seconds, another short left press). When it's done, do a long left press to try to upload the session to your backend. It will not succeed, because we have not yet created any bike setups, but this attempt will record the unique ID, so we will later be able to select it when we create our setup. You can turn off the unit for now.
When you open the web interface in your browser, you will be presented with an
almost empty black page. Click on the "user" icon in the top right corner, and
login with credentials you got from the docker log ... command.

You might want to change the default password. The new one should be at least 10 characters long, but there are no other requirements.
After logginig in, a few more icons appear. Click on the gear, which brings up the New bike setup form.
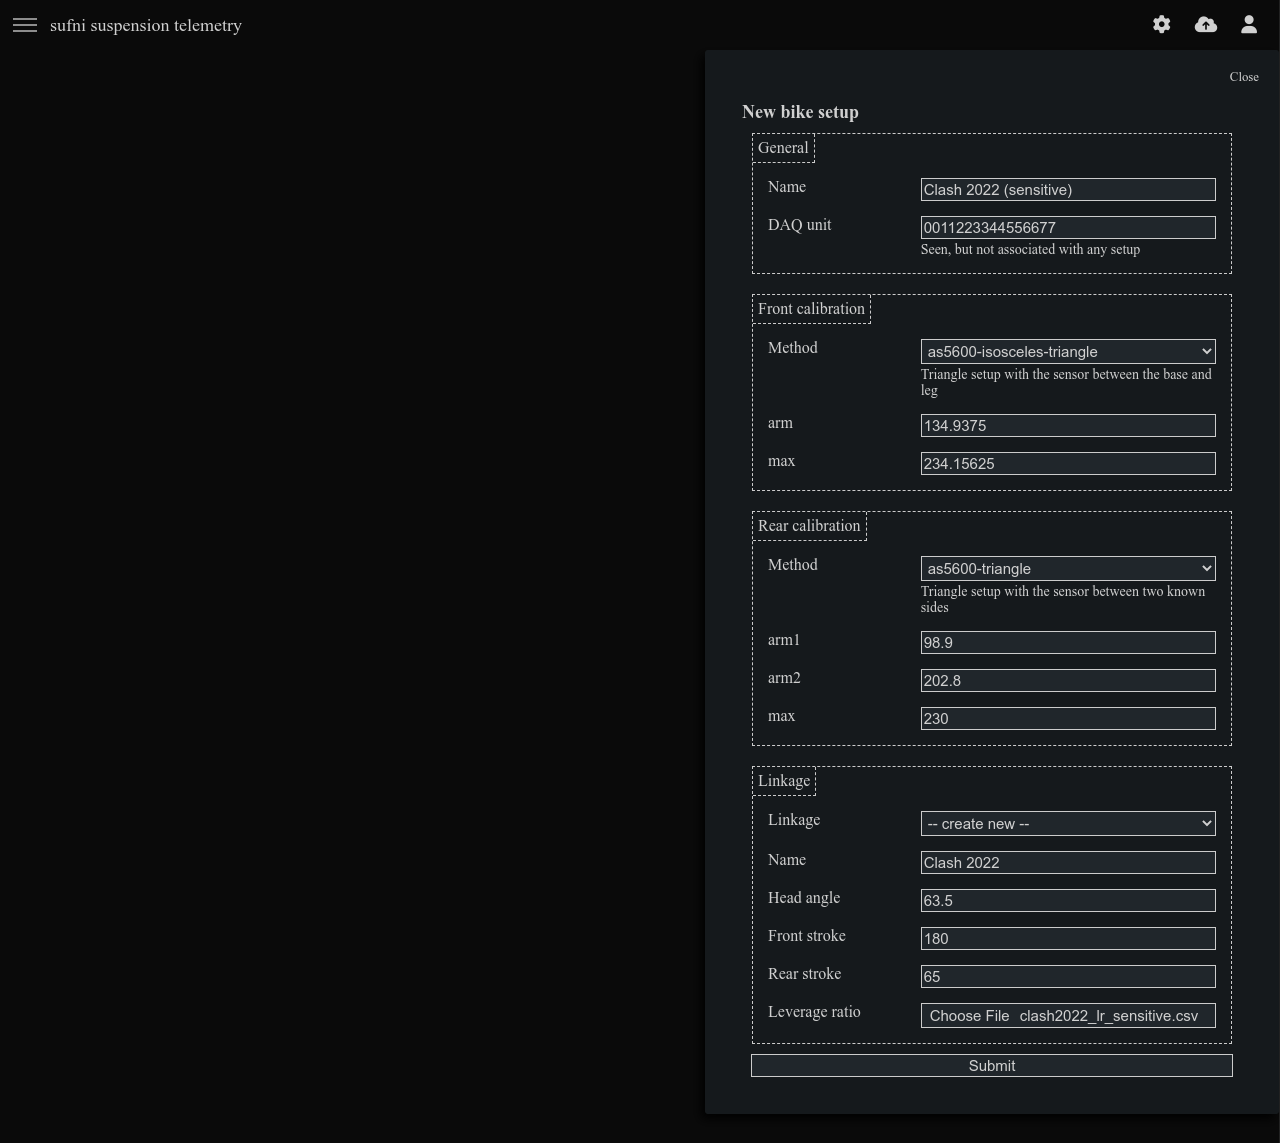
You need to set a name for the setup, and optionally choose a DAQ unit to associate it with. We tried to upload a session in the previous chapter, so the ID should be in the dropdown list.
At least one sensor calibration need to be set up as well. A typical setup with
both front and rear suspension will have an as5600-isosceles-triangle type
calibration for the front, and an as5600-triangle for the rear. The pictures
below show which measurement each parameter belongs to.

The system can also handle the traditional linear potentiometer-based distance sensors using the linear-potmeter type calibration. This requires two input values: resolution is the resolution of the ADC in bits (12 for the Pico), and stroke is the maximum measurable distance of the potentiometer. Please refer to the 02 Data Acquisition Unit
wiki page on how to build the firmware to support this.
We need to give some information on the bike itself as well. Head angle and
suspension strokes are self-explanatory, and the leverage ratio should be given
as a CSV files that contains either wheel travel - leverage ratio, or shock
travel - wheel travel data. The headers for these columns should be Wheel_T,
Leverage_R, and Shock_T. For example, the following are valid formats:
Wheel_T;Leverage_R
0;3.18
1;3.173

...

173;2.368
174;2.366
Shock_T;Wheel_T
0;0
0.374131533313904;1

...

65.5780055537117;153
66.1151178206595;154
One way to get this data is processing leverage ratio graphs found on the internet with e.g. graphreader.com.
With all the information filled in, you can click on the Submit button, and
you are now ready to upload sessions from your DAQ.