Manifold Meshes
- Examples of Manifold Meshes
- Examples of Non-Manifold Meshes
- Detecting Non-manifold geometry
- Debugging issues with obstacles
A mesh is manifold if it has a clearly defined inside and outside. A manifold mesh is watertight and contains no holes or missing faces that would cause leaks into the interior of the shape's volume. For a mesh to be manifold, every edge must have exactly two adjacent faces.
A non-manifold mesh is a mesh that cannot exist in real life. All real life objects have a volume that can be considered the inside of that object.
For the simulator to run correctly and predictably, it is important that the meshes for fluid, obstacle, inflow, and outflow simulation objects must be manifold. For the simulator to make calculations correctly, it must be able to determine what parts of a mesh are 'inside' and what parts are 'outside'. This can only be done if the mesh is manifold.
Warning: The addon will export meshes with modifiers applied and some Blender modifiers can result in non-manifold geometry. An example is the Edge Split modifier. The edge split modifier will split edges and faces into separate components, which will result in non-manifold geometry.
Note: In addition to manifold geometry, all parts of an object should also have sufficient thickness in order to be resolved on the simulation grid.
|
Cube It is easy to see that a cube is a manifold mesh. Each edge is connected to exactly two faces, and it is simple to tell if a point is on the inside or outside. |

|
|
Torus A torus has a hole, but it is still manifold because the hole does not 'leak' into the inside volume. |

|
|
Two Separate Icospheres Alone, each sphere is manifold, but if they were joined into the same object, would it remain manifold? Yes! Every edge in the joined mesh is still connected to exactly two faces and it is simple to determine what points are on the inside or outside of the mesh. |

|
|
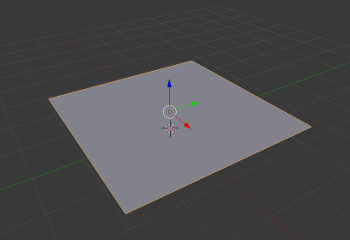
Plane A plane is an example of non-manifold geometry. Every edge is connected to only one face. A plane is infinitely thin, has no volume, and cannot exist in real life. Even the thinnest piece of paper has a thickness. |
|
|
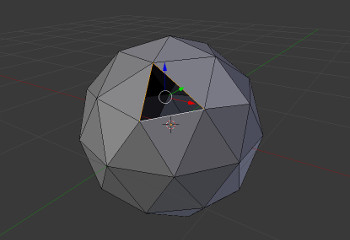
Icosphere With a Missing Face An icosphere is manifold, but once you remove a single face it becomes non-manifold. The edges around the hole are only connected to one face. The object no longer has an inside and becomes an infinitely thin shell. |
|
|
Monkey (Suzzanne) Blender's Monkey object might look like a regular manifold mesh, but if you look at the mesh closely, you'll see that the eyes are disjointed from the head and are actually infinitely thin shells. This causes the mesh to be classified as non-manifold. |

|
Non-manifold parts of a mesh (vertices or edges) can be highlighted in Blender object edit mode with Select > Select All by Trait > Non Manifold.
Important Note: this operator will not select intersecting faces which are also considered non-manifold geometry. For detecting intersecting faces, use Blender's built-in 3D-Print Toolbox described in the next topic.

Blender's built-in 3D-Print Toolbox addon can also be used to check for non-manifold geometry, and also checks for other mesh issues such as intersecting faces (of which can cause problems within the simulator). This addon also can be enabled in Blender > Edit > Preferences > Addons by searching for 3D-Print Toolbox. The addon operators can be found in the sidebar menu.
Tips:
- Geometry issues produced by modifiers in the modifier stack will not be detected. You may be required to apply all modifiers in order to accurately detect geometry issues.
- The 3D-Print Toolbox can also automatically repair non-manifold geometry using the Make Manifold operator. The Make Manifold operator needs to make a guess on how to repair your geometry and may not produce desirable or correct results if the geometry of your mesh is complex.


The FLIP Fluids addon contains an obstacle debug visualizer (see FLIP Fluid Debug panel) to display how the simulator is converting your obstacle objects into solid volumes within the simulator. See the first tip in our 10 Tips to Improve Your FLIP Fluids Workflow in Blender article/video for a guide on how to debug issues with obstacle objects.
