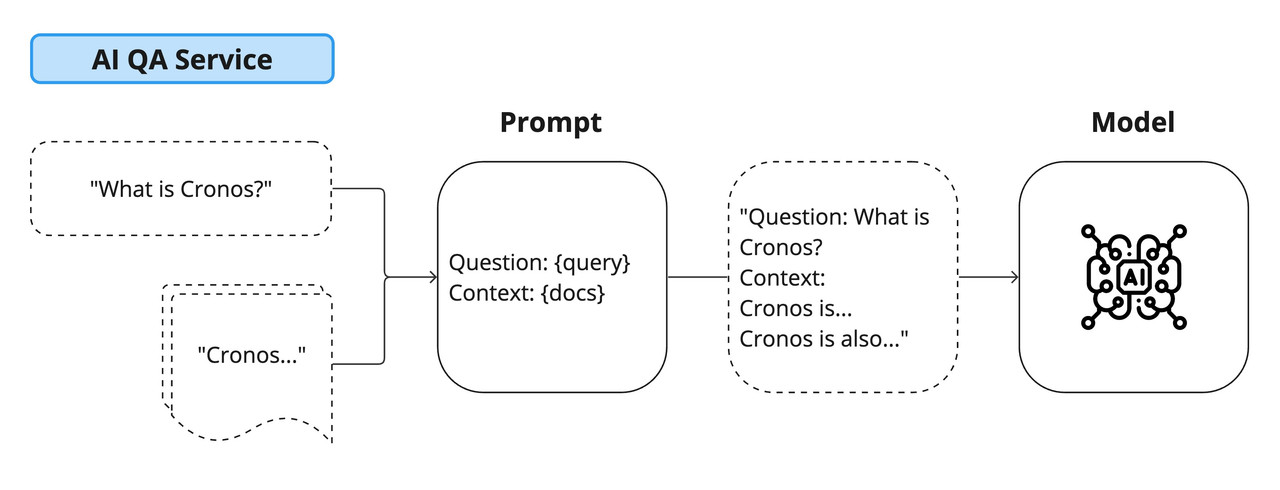
The AI QA Service is a Node.js TypeScript application designed to host QA services utilizing the LangChain library and OpenAI integrations. This document provides detailed instructions on setting up, configuring, and running the service, including Docker containerization and security key generation.
- Prerequisites
- Setting Up the Project
- Running the Service
- Docker Setup
- Generating Security Keys
- Environment Variables
- Local Document Context
- Endpoints
- VS Code Configuration
- Testing
- Links of Interest
- Node.js v18.0.0 or later
- npm v9.4.0 or later
- Docker (for containerization)
- TypeScript knowledge (for development)
- C++ build tools for native module compilation. This is required for the
hnswlib-nodemodule. Depending on your operating system, the installation steps may vary:- For Windows, install the Windows Build Tools via npm:
npm install --global windows-build-tools
- For macOS, you need Xcode Command Line Tools. You can install them by running:
xcode-select --install
- For Linux distributions, you need to install
build-essentialand other necessary development tools. For example, on Ubuntu or Debian-based systems, run:sudo apt-get install build-essential
- For Windows, install the Windows Build Tools via npm:
-
Clone the repository to your local machine.
-
Navigate to the project directory.
-
Install dependencies:
npm install
-
Compile TypeScript files to JavaScript:
npm run build
-
Run the service in development mode:
npm run dev
-
Build the Docker image using the provided Dockerfile:
docker build -f .docker/build.dockerfile -t ai-qa-service . -
Run the service using Docker:
docker run -it --init \
  -e DB_HOST=your_db_host \
  -e DB_NAME=your_db_name \
  -e DB_USERNAME=your_db_username \
  -e DB_PASSWORD=your_db_password \
  -e NODE_ENV=your_node_env \
  -e OPENAI_API_KEY=your_openai_api_key \
  -e QA_READ_API_KEY=your_qa_read_api_key \
  -e QA_READ_API_SECRET=your_qa_read_api_secret \
  -e QA_WRITE_API_KEY=your_qa_write_api_key \
  -e QA_WRITE_API_SECRET=your_qa_write_api_secret \
  ai-qa-service
The security module in the application provides functions for generating secure API keys and secrets. It uses cryptographic functions for enhanced security.
-
To generate an API key:
const apiKey = security.generateApiKey();
-
To generate an API secret for a given key:
const apiSecret = security.generateApiSecret('your-key');
Set the following environment variables in a .env file:
DB_HOST,DB_NAME,DB_USERNAME,DB_PASSWORDfor database configuration.NODE_ENVfor setting the environment (development, production, etc.).OPENAI_API_KEYfor OpenAI integration.QA_READ_API_KEY,QA_READ_API_SECRET,QA_WRITE_API_KEY,QA_WRITE_API_SECRETfor qa service authentication. These keys can be generated with the previous functions (e.g. apiKey, apiSecret).
To provide contextual information to the LangChain library, you can place .txt or .json files in the src/integrations/docs folder. The content of these files will be used to create local vectors for enhanced qa responses.
-
Utilize the createLoader function in LangChain to load these documents:
createLoader: (): DirectoryLoader => {
  return new DirectoryLoader('./src/integrations/docs', {
    '.json': (path) => new JSONLoader(path),
    '.txt': (path) => new TextLoader(path),
  });
};
The service exposes various endpoints for qa interactions:
-
Health Check:
GET /healthcheck
-
Generate Query:
POST /api/v1/qa-service/generate/query
-
Body example for POST request:
{
  "query": "Help me to get started with the cronos chain..."
}
For auto-formatting in VS Code, add the following settings to .vscode/settings.json:
{
  "editor.defaultFormatter": "esbenp.prettier-vscode",
  "editor.formatOnSave": true,
  "prettier.printWidth": 120
}Run the test suite with the following command:
npm run test


