Windows Scheduled Task Parser - DFIR's tool parsing XML-based Windows Scheduled Tasks. This tool was created for all DFIR analysts that need to parse XML-based Windows Task (you can find them in this location: C:\Windows\System32\Tasks). Usually as forensics analysts we collect the most important data from the live machine and then analyze them on our lab machines. But during my work, I discovered that manual attempt to parse these specific artifacts consumes a lot of time and it's very inefficient, therefore I decided to create a GUI tool that will parse all tasks at once and give me the ability to easily analyze each of them in a very convenient manner.
This is what the current version of the tool looks like, it can change in the future.

As it has been said earlier, the tool only parses XML-based files. First we need to click FILE -> OPEN and choose the directory thta we want to parse. The tool checkes all files found in the directory (recursively) and check if the magic header of the file meets Scheduled Task requirements. The magic header for Windows Scheduled Task is FF FE 3C 00 3F 00 78 00 6D 00 6C.

This is a piece of code responsible for checking file header. It reads first 10 bytes of the file and check if it is correct, if it is it will continue parsing, if not it will log the name of the file in the "log console" and continue enumerating files.
string[] files = Directory.GetFiles(path, "*", SearchOption.AllDirectories);
foreach (var file in files)
  {
    try
    {
      using (FileStream fileStream = new FileStream(file, FileMode.Open, FileAccess.Read))
        {
          using (var fileReader = new BinaryReader(fileStream, new ASCIIEncoding()))
          {
            //FF FE 3C 00 3F 00 78 00 6D 00 6C Magic Header for Windows XML tasks
            //255 254 60 0 63 0 120 0 109 0 108
            byte[] buffer = new byte[10];
            buffer = fileReader.ReadBytes(10);

            if (buffer[0] == 255 && buffer[1] == 254 && buffer[2] == 60 && buffer[3] == 0 && buffer[4] == 63 && buffer[5] == 0 && buffer[6] == 120 && buffer[7] == 0 && buffer[8] == 109 && buffer[9] == 0 && buffer[10] == 108)
            {
                <parse>
            }
           }
         }
    }
 }
All not parsed files will be listed in the Log Console that you can find in the bottom of the window (screenshot below).

In addition to that, in the right top corner there are small "stats" that tell you how many files were parsed properly and how many of them were not (screenshot below).

First of all, if you want to understand how this tool works, you need to understand the structure of Windows Scheduled Task. The entire structure is explained by Microsoft under this link: https://docs.microsoft.com/en-us/windows/win32/taskschd/task-scheduler-schema. And this is the documentaion that I was used creating that tool.
There are two main options that we can use to create a task. The first option is using a command line tool called SCHTASKS, this is the option you'll probably see most often when dealing with security incidents. The second option is to use Windows GUI tool called Task Scheduler (taskschd.msc). And this is the tool that I will use to support myself in explaning Schedule Tasks.

Once you open Task Scheduler and start creating a new task you will get the windows that I attached above. Here you can specify some basic things about the task like name or description, in addiiton to that you can also specify if the task is hidden or what priviliges it will use during execution. All that information are defined in the XML file that's gonna be created once you finish the task. Basic information about the file are saved under a XML node that is called RegistrationInfo. Below I am attaching an example.
  <RegistrationInfo>
    <Date>2021-08-19T22:05:28.7519938</Date>
    <Author>COMPUTER\DFIR</Author>
    <Description>Malicious task number 1</Description>
    <URI>\MaliciousTask1</URI>
  </RegistrationInfo>
And here we can see that tool was able to parse that information without any issues.

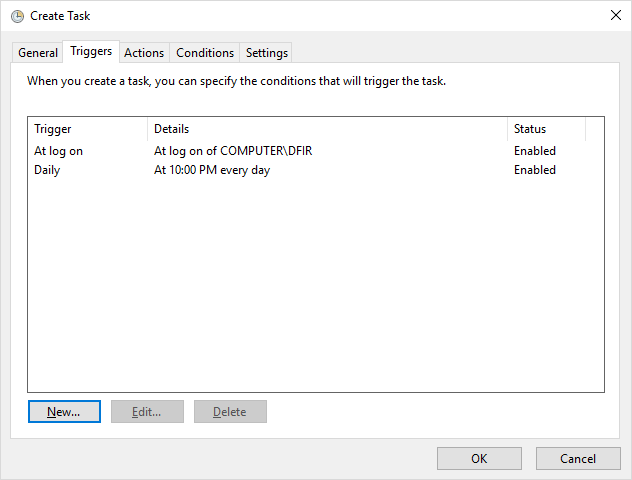
The next tab defines triggers. Trrigers indicate when and how many times specififc task will be executed. What is very important to point out here is that a schedule task can have several triggers and they all are stored in the XML file.


We have several types of triggers, and they are shown quite good on the screehsot below.
   <xs:complexType name="triggersType">
        <xs:group ref="triggerGroup" minOccurs="0" maxOccurs="48"/>
    </xs:complexType>
    <xs:group name="triggerGroup">
        <xs:choice>
            <xs:element name="BootTrigger"               type="bootTriggerType"               minOccurs="0" />
            <xs:element name="RegistrationTrigger"       type="registrationTriggerType"       minOccurs="0" />
            <xs:element name="IdleTrigger"               type="idleTriggerType"               minOccurs="0" />
            <xs:element name="TimeTrigger"               type="timeTriggerType"               minOccurs="0" />
            <xs:element name="EventTrigger"              type="eventTriggerType"              minOccurs="0" />
            <xs:element name="LogonTrigger"              type="logonTriggerType"              minOccurs="0" />
            <xs:element name="SessionStateChangeTrigger" type="sessionStateChangeTriggerType" minOccurs="0" />
            <xs:element name="CalendarTrigger"           type="calendarTriggerType"           minOccurs="0" />
        </xs:choice>
    </xs:group>

The most complicated trigger type (that gives us several options) is the "on a schedule" trigger. That option allows to add triggers based on the calendar. First option "One time" as the name suggests adds trigger that will run task only once. Other options under that type are Daily, Weekly and Monthly. All four options (including "One time") have multiple additional settings. Most important are "Repeat task every" and "for a duration of". These two settings allow us to repeat the task execution every some period of time and we can also specify for how long we want to repeat it. To better ilustrate it let's use an example. Let's say we created a task that will trigger once, but will repeat every 5 minutes for next 10 days. Does it then mean that malicious software will be executed only one time? Not really... It's very important feature to understand and of course remember, becuase the wrong understaing can lead to a wrong verdict and big mistakes in the investigation.

Windows Scheduled Task Parser enumerates all triggers. Let's take a look at the example below:
<CalendarTrigger>
      <StartBoundary>2021-08-23T14:30:12</StartBoundary>
      <Enabled>true</Enabled>
      <ScheduleByWeek>
        <DaysOfWeek>
          <Monday />
          <Tuesday />
        </DaysOfWeek>
        <WeeksInterval>6</WeeksInterval>
      </ScheduleByWeek>
</CalendarTrigger>
<CalendarTrigger>
      <StartBoundary>2021-08-23T14:30:19</StartBoundary>
      <Enabled>true</Enabled>
      <ScheduleByWeek>
        <DaysOfWeek>
          <Wednesday />
        </DaysOfWeek>
        <WeeksInterval>43</WeeksInterval>
      </ScheduleByWeek>
</CalendarTrigger>
Based on the code above we can see that we have at least two triggers of the same type - they are both "CalendarTriggers". For each XML node, we can have sevreal subnodes like: StartBoundary, ScheduleByDay, EndBoundary and muhc more. The tool will check all of them and make a note of it.
The next tab called "Actions" specifies what action will be executed once task is launched. As in the previous tab, we can create multiple diffrent actions. For example, one task can start 12 different executables.


"Icon made by Freepik from www.flaticon.com"