Pixy2 API ported to Java for FIRST Robotics RoboRIO
Supported link types: SPI, I2C (Untested), UART/Serial (Untested)
New link types can be easily added by implementing Link
Original Pixy2 Code for C++ Arduino
To install the API, it can either be downloaded and copied directly into the project, or you can use it with Gradle/Maven.
The maven repository is located at: https://nexus.otake.pw/repository/maven-public/ The group id is pw.otake.pseudoresonance and the artifact name is pixy2-java-api For FRC Gradle builds, this can be easily added by adding the following to build.gradle in the project's root.
Add maven { url 'https://nexus.otake.pw/repository/maven-public/' } under repositories
Add compile 'pw.otake.pseudoresonance:pixy2-java-api:1.1' under dependencies Replace 1.1 with the current version of the API.
Your build.gradle should resemble this:
// Maven central needed for JUnit
repositories {
    mavenCentral()
    maven { url 'https://nexus.otake.pw/repository/maven-public/' }
}

// Defining my dependencies. In this case, WPILib (+ friends), and vendor libraries.
// Also defines JUnit 4.
dependencies {
    compile 'pw.otake.pseudoresonance:pixy2-java-api:1.1'
    compile wpi.deps.wpilib()
    compile wpi.deps.vendor.java()
    nativeZip wpi.deps.vendor.jni(wpi.platforms.roborio)
    nativeDesktopZip wpi.deps.vendor.jni(wpi.platforms.desktop)
    testCompile 'junit:junit:4.12'
}First create a Pixy2 camera object with Pixy2 pixy = Pixy2.createInstance(link) and supply the link type of your choosing. Next, initialize the Pixy2 camera with pixy.init(arg). You can either omit arg, your add a value based on the link type.
The Pixy2 can now be called on with the various provided methods as outlined in the documentation and on the Pixy2 website.
SPI is the recommended link type due to it's higher data transfer rate as well as better implementation in the WPILib API which helps with efficiency.
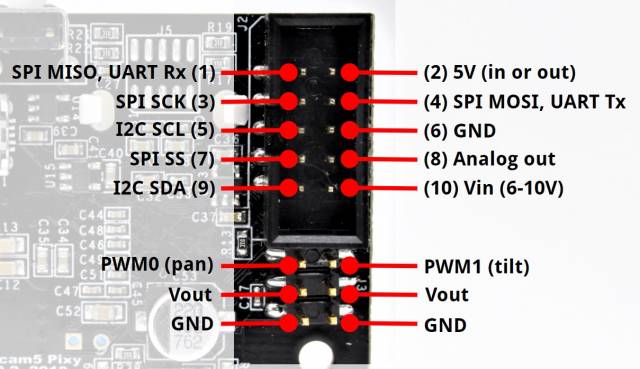
| Pixy2 Port | RoboRIO Port |
|---|---|
| 1 | MISO |
| 2 | 5V |
| 3 | SCLK |
| 4 | MOSI |
| 6 | ⏚ Ground |
| 7 | CS0 (Optional) |
NOTE: Pin 7/CS0 pin is the optional SPI Slave Select (SS) pin. It can be connected to any SS pin on the RoboRIO, CS0, CS1, CS2 or CS3. If slave select functionality is not needed, set the Pixy2 to use the data output Arduino ICSP SPI. Use SPI with SS for slave select support. In the code, the slave pin in use can be selected by using an initialization argument of the corresponding pin. 0 for CS0, 1 for CS1, etc.
| Pixy2 Port | RoboRIO Port |
|---|---|
| 2 | 5V (from VRM) |
| 5 | SCL |
| 6 | ⏚ Ground |
| 9 | SDA |
NOTE: The RoboRIO does not have a 5V output for I2C, and thus, the 5V must be sourced elsewhere, such as from the VRM.
| Pixy2 Port | RoboRIO Port |
|---|---|
| 1 | RXD |
| 2 | 5V (from VRM) |
| 4 | TXD |
| 6 | ⏚ Ground |
NOTE: The RoboRIO does not have a 5V output for UART/Serial/RS-232, and thus, the 5V must be sourced elsewhere, such as from the VRM.
