-
Notifications
You must be signed in to change notification settings - Fork 70
Anura3D Tutorial Manual v2021
Complementary reading: Fern E.J., Rohe A., Soga K., Alonso E.E. (2019) The Material Point Method for Geotechnical Engineering - A Practical Guide. CRC Press, London.

Authors: Alba Yerro; Alexander Rohe; James Fern; Francesca Ceccato; Veronica Girardi
 Interactions between soil, water, and structures plays an important role in geotechnical, environmental and civil engineering problems, such as landslides induced by seepage and rain, liquefaction or fluidisation, and sedimentation processes in submerged slopes, internal erosion in dykes, scouring around offshore structures, consolidation-induced settlement or pile installation in saturated soils. In many cases, the material involved can experience large deformations, which can lead to dramatic events. The numerical modelling of these processes is challenging because the treatment of soil-water coupling, soil-structure
interaction, and large deformations is not straightforward.
 MPM is a point-based numerical method capable of modelling large deformations, which has been extended and implemented in the software to cope with advanced soil-water-structure interaction problems. This tutorial manual provides instructions on how to perform numerical simulations with . More detailed information on the material point method and its applications is given by and a list of publications based on
Anura3D is in our website.
The Software is being developed by the Anura3D MPM Research Community. In this international collaboration the complementary expertise of different groups that carry out research on numerical modelling of large deformations and soil–water–structure interaction is brought together. For more information visit the website www.anura3d.com of the Anura3D MPM Research Community.
The Anura3D MPM Research Community is collaborating with CIMNE (International Center for Numerical Methods in Engineering) is granting free temporal licences for the academic purposes of the Anura3D MPM Research Community. The software is using GiD as pre-processing software and for mesh generation. The support of CIMNE is greatly acknowledged.
is a research-oriented software developed by the Research Community (Sec. 1.2). The code has been validated and tested with a limited number of problems. The Anura3D MPM Research Community shall not be responsible for losses of any kind, resulting from the use of this program. The is an open source software under the GNU Lesser General Public License version 3.
The most relevant publications related to the development and application of the software is available online on the website of the Anura3D MPM Research Community where direct links to the respective journals or theses for download are provided: www.anura3d.com –> menu "Publications". The development of the current code started in 2008 and is ongoing.
The features implemented in the open source are briefly summarized in Table [tab:AnuraFeatures]. While some of them have been tested, others are still under developemnt. The examples provided in this tutorial provide guidance to the user through the available tested features.
| Name of the feature | Under development | Tested |
|---|---|---|
| Geometrical dimensions | ||
| 2D - plane strain | X | |
| 2D - axisymmetric | X | |
| 3D - cartesian | X | |
| 3D - cylindrical | X | |
| Computational methods | ||
| MPM-MP | X | |
| MPM-MIXED | X | |
| UL-FEM | X | |
| FEM | X | |
| Integration schemes | ||
| Explicit | X | |
| Implicit | X | |
| Multiphase formulations | ||
| 1-phase (dry material, undrained, drained) | X | |
| 2-phase single-point for saturated soil | X | |
| 2-phase double-point | X | |
| 3-phase single-point | X | |
| Constitutive models | ||
| Linear elastic | X | |
| Mohr-Coulomb | X | |
| Other features | ||
| Contact algorithm | X | |
| Moving mesh | X | |
| Excavation | X | |
| Rigid body | X | |
| Bulk viscosity | X | |
| Submerged analysis | X | |
| Output of reaction forces at surfaces | X | |
| Boundary and initial conditions | ||
| Remove fixity | X | |
| Initial conditions | X | |
| Prescribed velocity | X | |
| Absorbing boundary | X | |
| K0 stress initialization | X | |
| Stress initialization with quasi-static convergence | X |
The current state of the has the following limitations concerning the tested features:
3D-Cylindrical: y-axis is the axis of symmetry, gravity can only be applied in y-axis direction.
Multiphase formulations: a combination of different material types can cause problems for certain combinations (undrained total stress and undrained effective stress), no water flow is transferred between saturated and dry materials.
Contact algorithm: the maximum number of contact materials is four (4), the maximum number of master materials is one (1). Contact is fixed on the mesh nodes.
Moving mesh: works only for prismatic bodies in 3D and trapezium areas in 2D, the moving mesh direction is constrained only in one direction. the moving mesh needs an extension and/or compression mesh.
Excavation: limited to 30 excavation stages.
Rigid body: can be applied only to one body in the system, only works together with the contact algorithm, only moves in one direction, it can’t rotate.
Fixities and traction boundary conditions: only aligned with the coordinate axes
K0 stress initialization: limited only to horizontal surfaces, one homogeneous material (otherwise, use gravity together with local damping and stress initialization with quasi-static convergence criteria)
The user should also take into account the following warnings:
Multiple materials: the use of several drainage material types on the same model is not recommended.
Absorbing boundaries: do not prevent material points from leaving the mesh.
Authors: Alba Yerro; Alexander Rohe; James Fern; Francesca Ceccato; Luis E. Zambrano-Cruzatty
is a software tool for numerical analysis of geotechnical problems developed by the Anura3D MPM Research Community and distributed as open-source code programmed using Fortran. This software is a 2D/3D implementation of the material point method (MPM) and it is used for simulating the physics involved in soil-water-structure interaction and large deformation problems. There is no warranty or liability in any sense for the use of the provided software or results (see "Copyright and Liability Anura3D" at the beginning of this document). The list of implemented and under development features is provided in Table [tab:AnuraFeatures].
This chapter explains how to get started with . First, the software required to interface the code and the process to compile it are explained in Section 1.2. the basis to perform a numerical simulation (Section 1.1). Subsequently, the installation instructions for both pre- and post-processing osftware are presented in Sections 1.3 and 1.4. In both cases, the use of third-party software is required.
The process to perform a numerical simulation consists of three parts as follows.
Creating input data with the GiD software (pre-processing)
Performing calculation with the software (compiled executable)
Visualisation of results with the ParaView software (post-processing)
A schematic description of this procedure is presented in Figure 1.1, and each step is explained below in this chapter.
 Procedure for performing a numerical
simulation with including pre- and post-processing.
requires two input files – the GOM file and the CPS file. Both files can be generated with the GiD pre-processing software (the installation instructions of GiD are given in Section 1.3). Both files are text files (ASCII), which can be modified manually by opening them in a text editor and changing the text. This is typically done for parametric analyses for which the value of a specific parameter is changed.
Definition of problem: GOM file
The GOM file describes the geometry of the problem, the
material data sets, initial and boundary conditions, loading conditions,
excavation phases, contact properties, number of material points, and
computational mesh. When a model is created, GiD writes all information
into the GOM file.
Definition of calculation data: CPS
file
The CPS file describes the calculation data such as the
computation method, calculation time step data, gravity data, load
multipliers, quasi-static convergence, damping, strain smoothing, output
data, etc. Unlike the GOM file, a CPS file is required
for each calculations phase. GiD is used to define the initial
CPS file, whilst the subsequent CPS files are generated at the
end of each calculation phase.
Additionally, utilizes the UMAT format for the use of constitutive models, which are interfaced as dynamic link libraries (DLL files).
is a stand-alone programme which can be executed from the Windows
command line or by running the calculate.bat file in the
project folder projectname.A3D. The process to compile the
code is explained in Section 1.2.
creates results by writing several output files (Figure 1.1). These files have to be treated differently depending on the file type.
VTK files
stores most of the output information in a set of files with
VTK extension. The ParaView post-processing software is
recommended to visualise the results stored in those output files (the
installation instructions of GiD are given in Section 1.4). There are four
different types of VTK files depending on the type of data
stored in them, and are as follows.
projectname_MeshData_SSSTTTTTT.VTKprojectname_MPScalar_SSSTTTTTT.VTKprojectname_MPVector_SSSTTTTTT.VTKprojectname_MPTensor_SSSTTTTTT.VTK
where projectname is the user-defined name of the
project and SSS and TTTTTT are the
automatically assigned calculation step and time step numbers,
respectively. The variables of the VTK files are listed in 1.2.
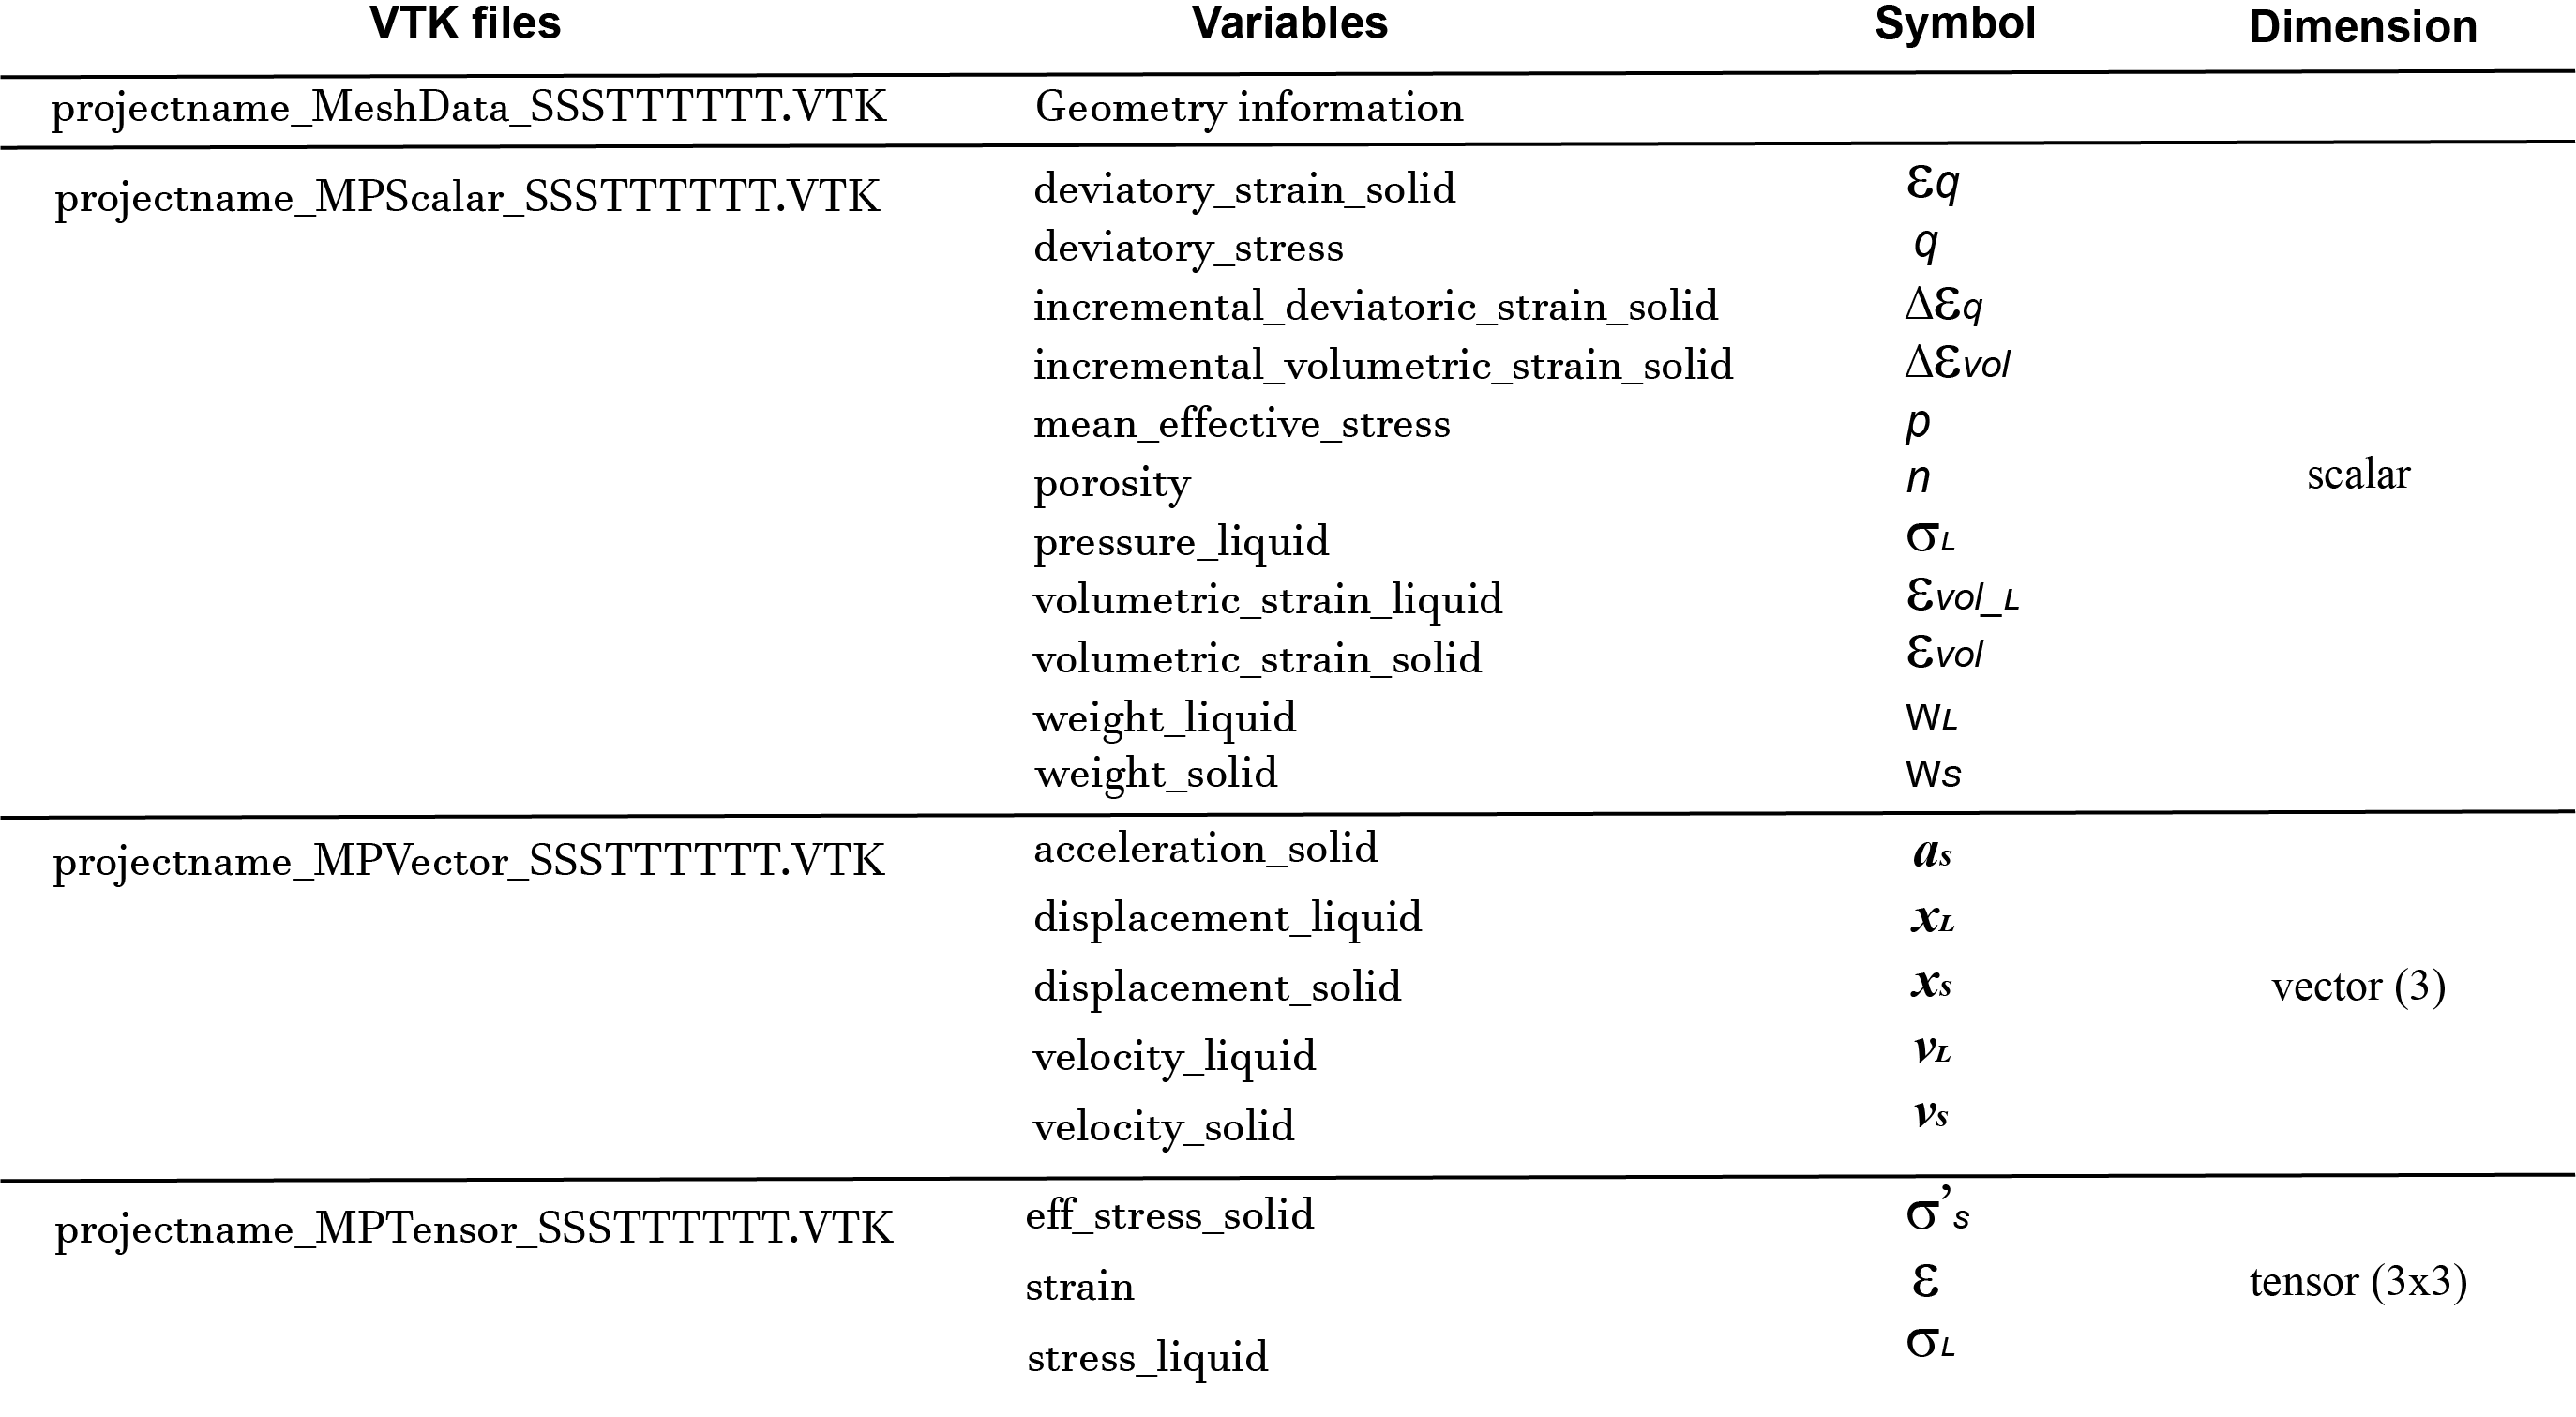 Scalar, vector and tensor components in
the VTK files.
The mesh data, such as the mesh location and active elements, is
stored in MeshData. The material point data is stored
in:
MPScalar: collects all scalar quantities such as material point number, pore water pressure, mean and deviatoric stress, etc.MPVector: collects all vector quantities such as velocity, displacement, etc. The components of the vector are (X,Y,Z) in global coordinate system. For 2D analysis the third component (Z) is zero.MPTensor: collects tensorial quantities such as stress and strain. The tensor has 9 components, that ParaView enumerate from 0 to 8 starting from the top left corner of the matrix, as indicated in Figure 1.3.
 Components of the stress tensor in 2D and
3D in Paraview.
Other output files
Any text editor or spreadsheet software can be used to visualise the
other output files such as the files *.PAR and *.ENG).
The PAR file stores data from a given material point, which has
to be specified in the CPS file,
$$OUTPUT_MATERIAL_POINTS. The ENG files gives the
values of kinetic energy, internal work of the system and time step
information. Chapter [chp:oedometer_PAR] explains how
to create and read text output files.
Before performing any simulation with , it is required to compile the code and create an executable file.
is written in Fortran language and requires a text editor and a compiler to visualize the code and create the executable. The current version (Anura3D 2021- Centro) is supported only on Windows operating systems and requires Visual Studio (VS) and a Fortran Compiler, distributed in the oneAPI package (Base + HPC Toolkits). Since VS is a dependency for the oneAPI software, not all combinations of VS and oneAPI are compatible. Check the compatibility requirements using this link. Make sure to include the Intel oneAPI Math Kernel Library (oneMKL), during the installation of the Intel oneAPI Base Toolkit.
The VS Community version 2017 is recommended because it is freely distributed. Similarly, the oneAPI release is suggested. Intel offers academic licenses, provided an active .edu email address. Visit the sites shown bellow to download VS Community 2017 and the oneAPI (base and high performance computing toolkit) release.
The following steps are recommended for the successful installation of VS and oneAPI.
Check that the minimum hardware requirements for VS and oneAPI are fulfilled.
Download and install VS first.
-
When installing VS version 2017, the user is prompt to select custom workloads. Select "Desktop development with C++" as shown in Figure 1.4.
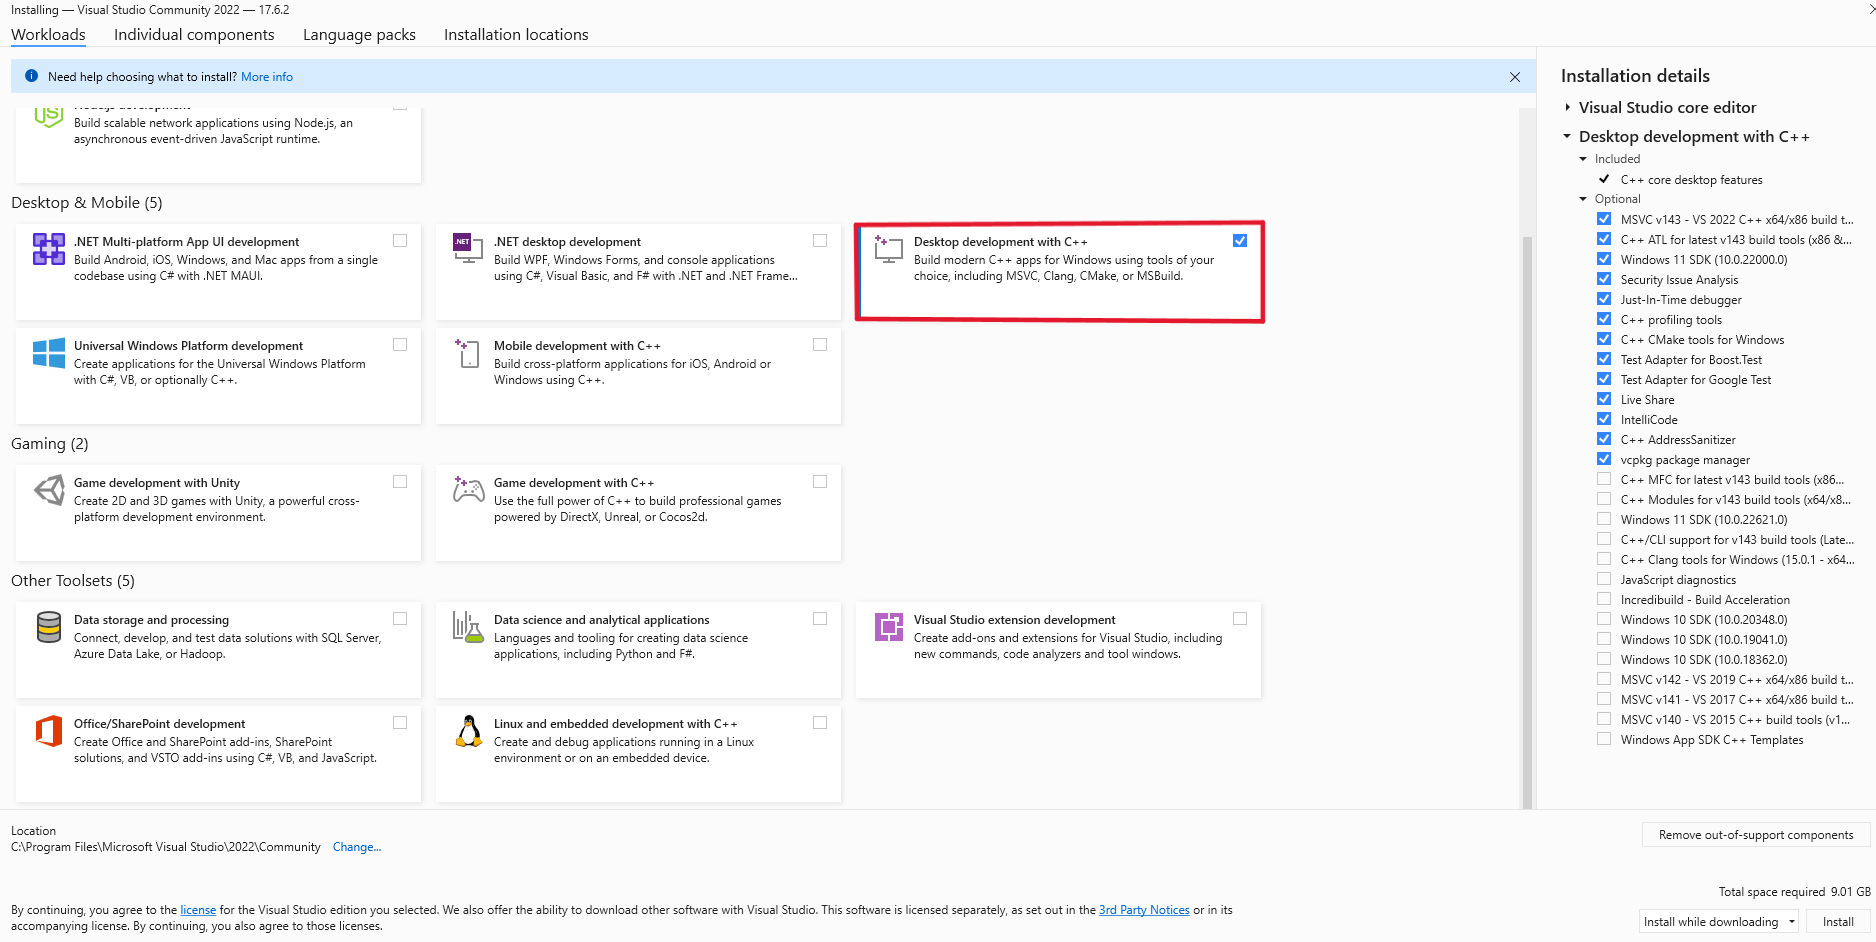 Visual Studio installer- Workload
tab.
For different versions of VS the corresponding C++ components must be installed. Consult this site’s information to get help.
Continue with the installation process following the instructions provided in the VS installer.
Download and execute the installation file for the oneAPI (base and high performance computing toolkit). Check that oneAPI is compatible with the previously installed VS version.
Depending on the oneAPI version, the installation manager will indicate if VS was installed successfully. If that is not the case, instructions are provided by the oneAPI installation manager.
In case VS was installed successfully, proceed to install oneAPI following the instructions on the screen.
-
Once the installation is completed, open a new project in VS as shown in Figure 1.5.
 Visual Studio 2017: Creating a new
project.
-
Select Console application under the Intel(R) Visual Fortran drop-down list as it is shown in figure 1.6. If you can see the options displayed in Figure 1.6, the installation of VS and oneAPI is successful, and they are integrated correctly.
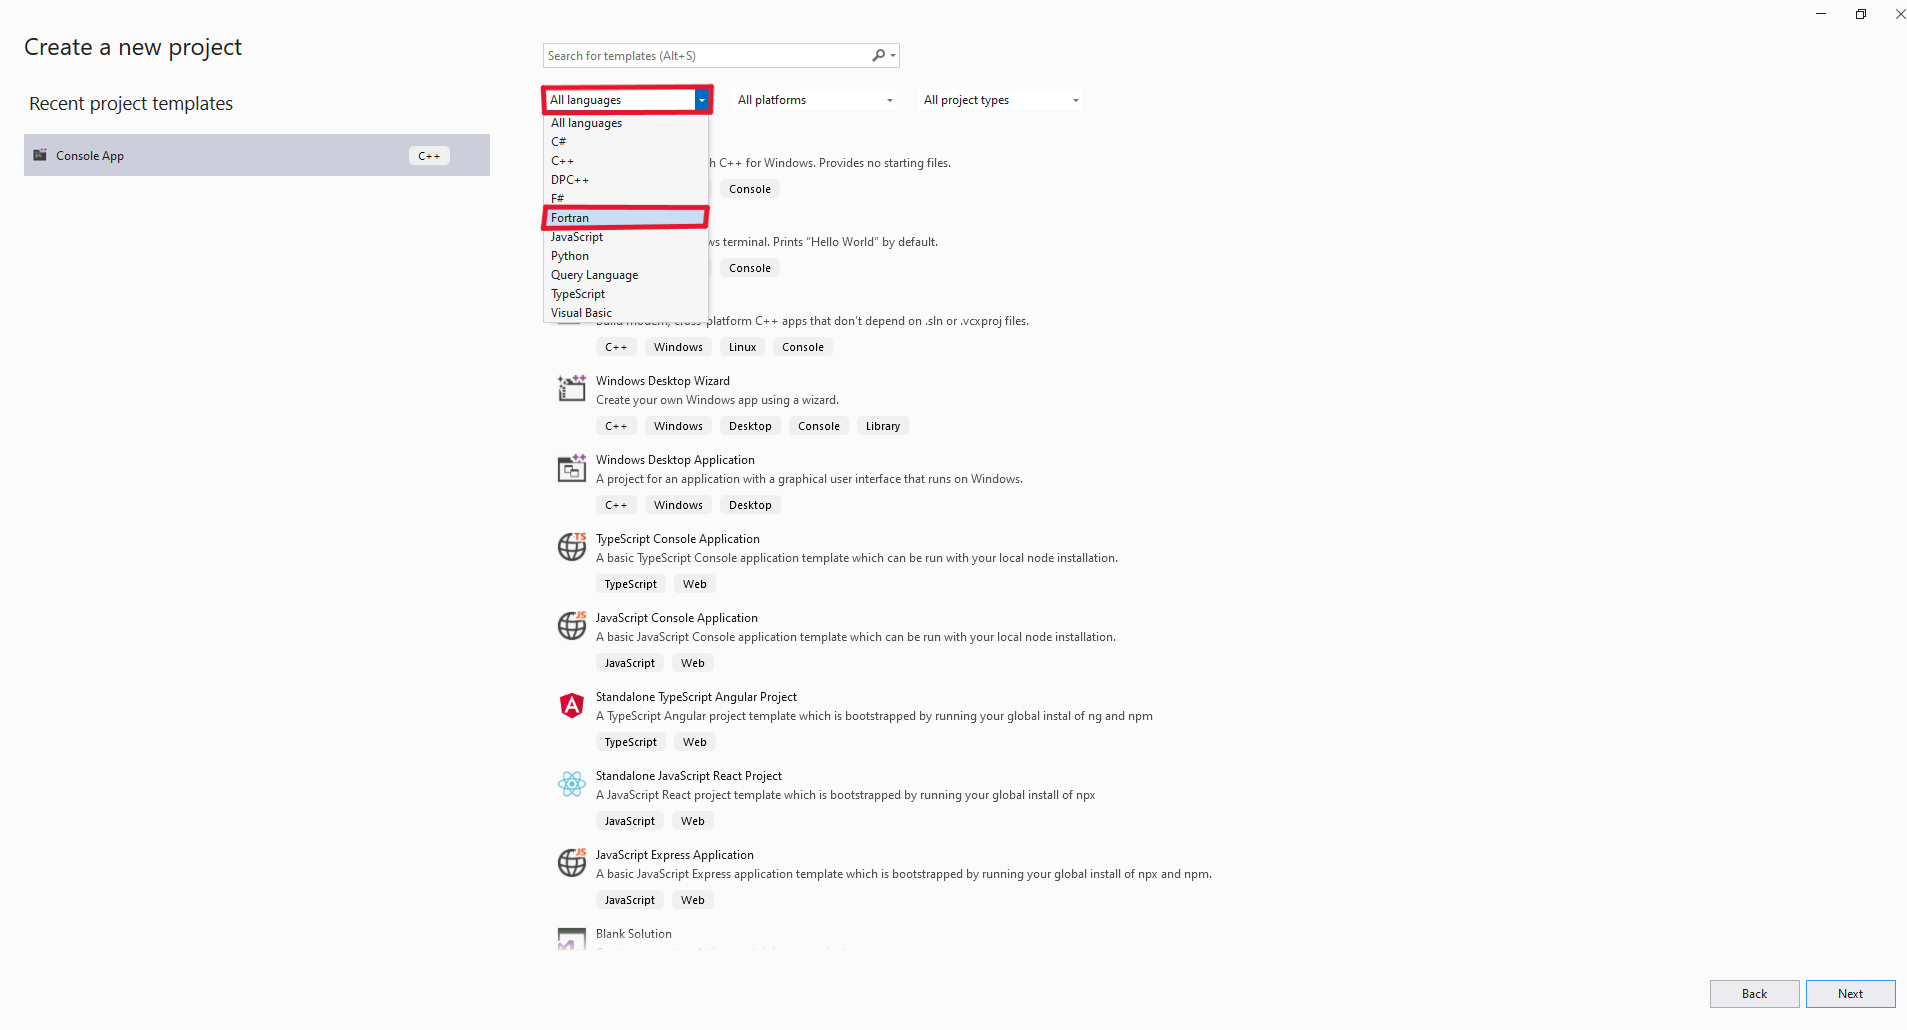 If Visual Studio 2017 and Intel Parallel
Studio XE 2019 are integrated correctly this option should be
available.
Once the installation of VS and oneAPI is completed, the code can be compiled. The following steps show how to build the code and its included constitutive models.
Navigate the code folder to the
".../Anura3D/VS"folder.Find and double click on the
DynamicMPM.slnfile.-
VS should initialize and show the screen observed in Figure 1.7.
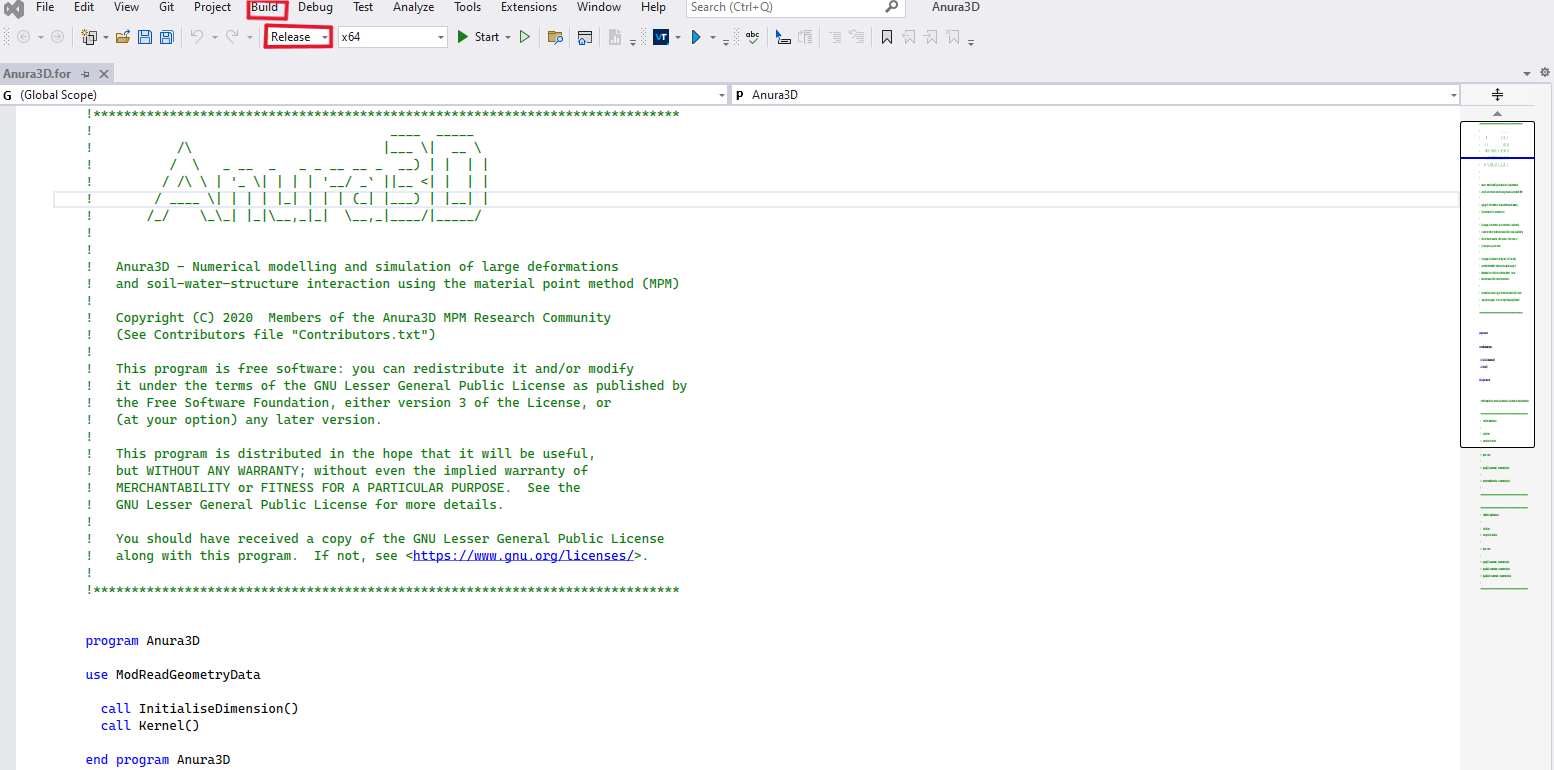 Anura3D code in Visual Basic 2017. To
compile the code click on the Build menu.
Click on the Build menu (Figure 1.7).
-
Click on Build Solution (Figure 1.8). This will compile the Anura3D executable together with the consitutive models (DLL files).
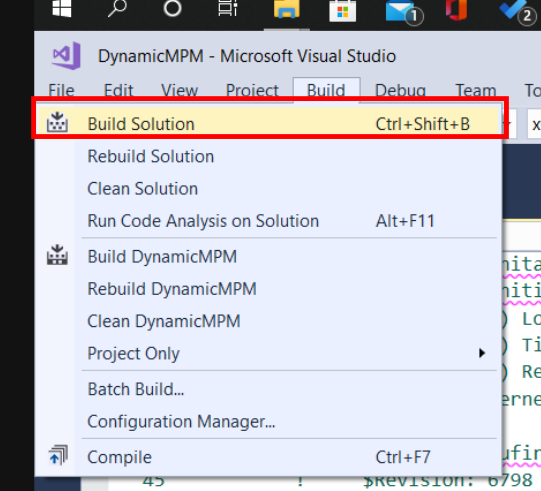 The code will be compiled after clicking
on Build Solution.
If the compilation is completed successfully, the executable is stored in the
".../Anura3D/VS/External"folder.The constitutive models’
DLLfiles can be found in the".../Anura3D/VS/External/SoilModels"folder.-
For troubleshooting look at the error messages shown in the Error List or the Output window as it is shown in Figure 1.9 and direct your questions to the forum at www.Anura3D.com specifying your VS and oneAPI versions with the error message displayed a the Error List or Output window.
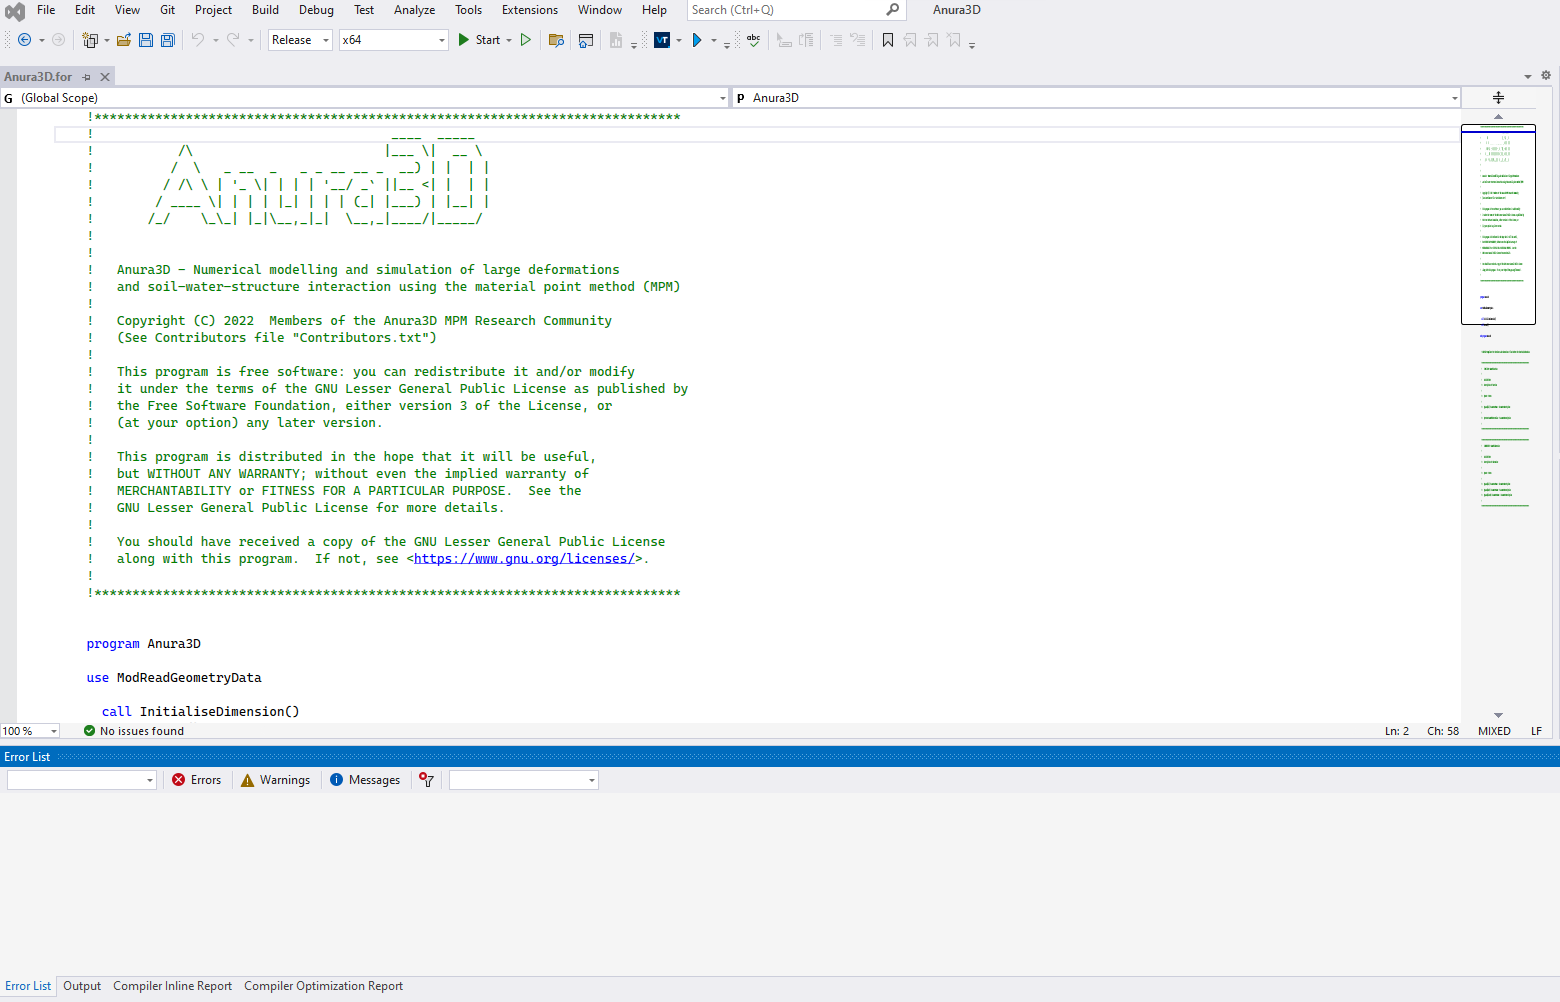 Error List window in Visual Studio
Community 2017.
GiD is a licensed software with free one-month license for first-time user, and can be renewed for free up to three times. The installation process is as follows.
-
Download the installation files (i.e. v14.0.1) at
-
Check the version number and operating system, and click on the "Download" button as shown in Figure 1.10.
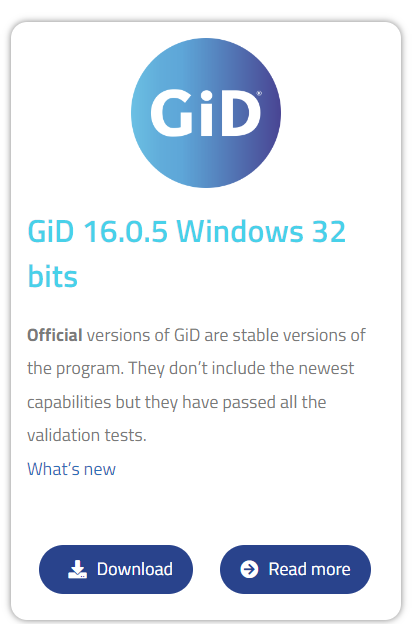 Download GiD v14.0.1 installation
files.
Start the installation and follow the on-screen instructions.
-
Obtain the one-month free license at:
-
Select the version number, license type, and time period as shown in Figure 1.11.
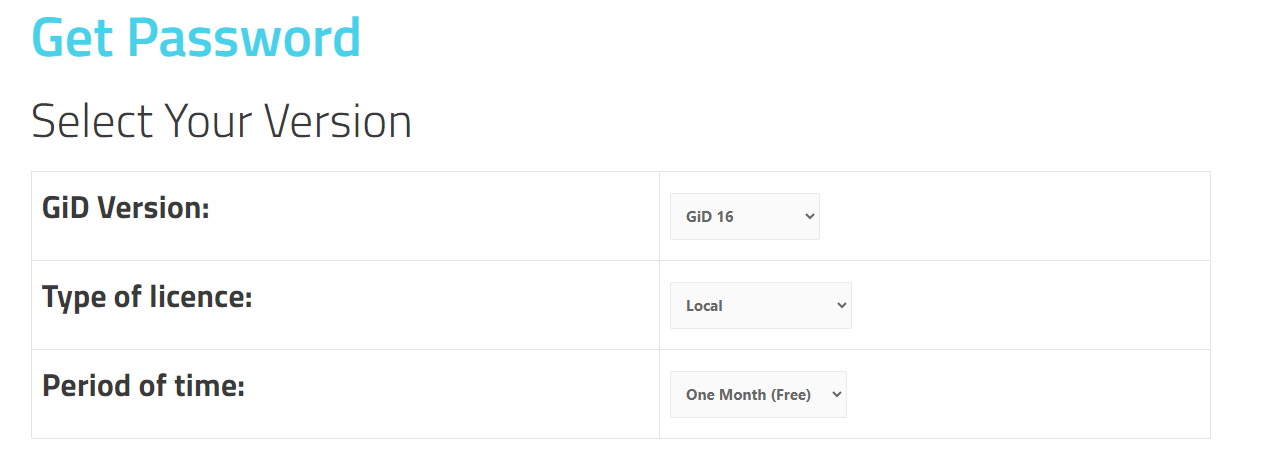 Obtain one-month free password for
GiD.
Follow the instructions on the website and provide the required information. A one-month free password will directly be provided (at the bottom of the website).
-
Enter the password in the "Enter password window" in GiD as shown in Figure 1.12.
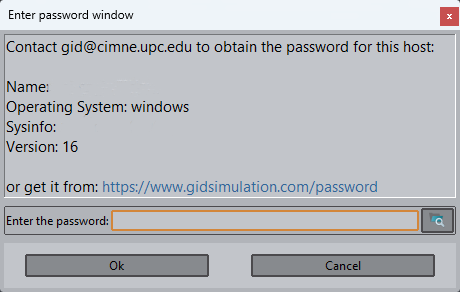 Enter password in GiD.
problemtype is meant to be used with GiD v14.0.1. GiD community and Anura3D community do not support the use of different versions.
The "problemtype" folder is needed to use the Software features in the GID pre-processor (more in section 1.1). The folder is partially pre-assembled and distributed with the Anura3D code. The "problemtype" folder must have the structure shown in Figure 1.13 to be completely functional, which include the executable and other dependencies.
 "Pproblemtype" folder structure. The
green files represent the path where the Anura3D_2021.exe and
the constitutive models *.DLL files must be
pasted.
To complete the assembling of the file and ensure its functionality proceed with the following steps:
Copy the executable file from
".../Anura3D/VS/External/"to"...Anura3D_2021.gid/exec/".Copy the DLL files in
"...Anura3D_2021.gid/DLL/".-
Finally, copy the "problemtype" into the GiD installation directory as shown in Figure 1.14.
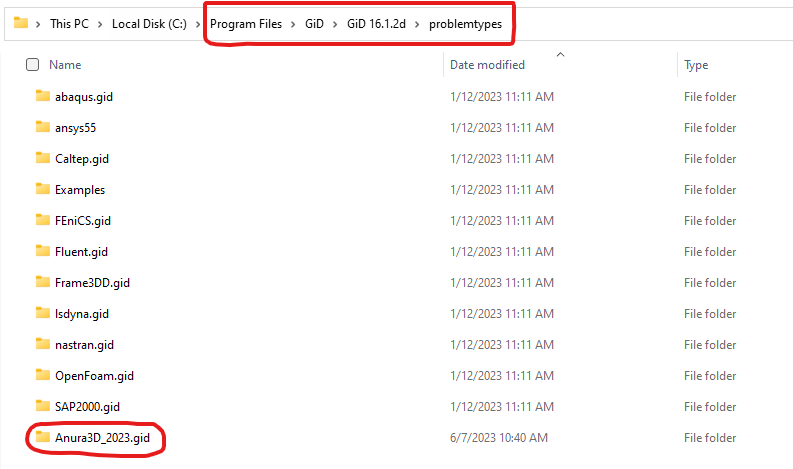 Copy problemtype into GiD installation
directory.
ParaView is an open-source software under a permissive BSD license and is, thus, free to use with . The original ParaView software will be used without any modifications of its source code. The following steps have to be performed to install ParaView.
-
Download the installation files of the latest supported ParaView version (i.e. v5.0.1) at:
-
Select the version number, download type and operating system, and click on the <Download> button as shown in Figure 1.15.
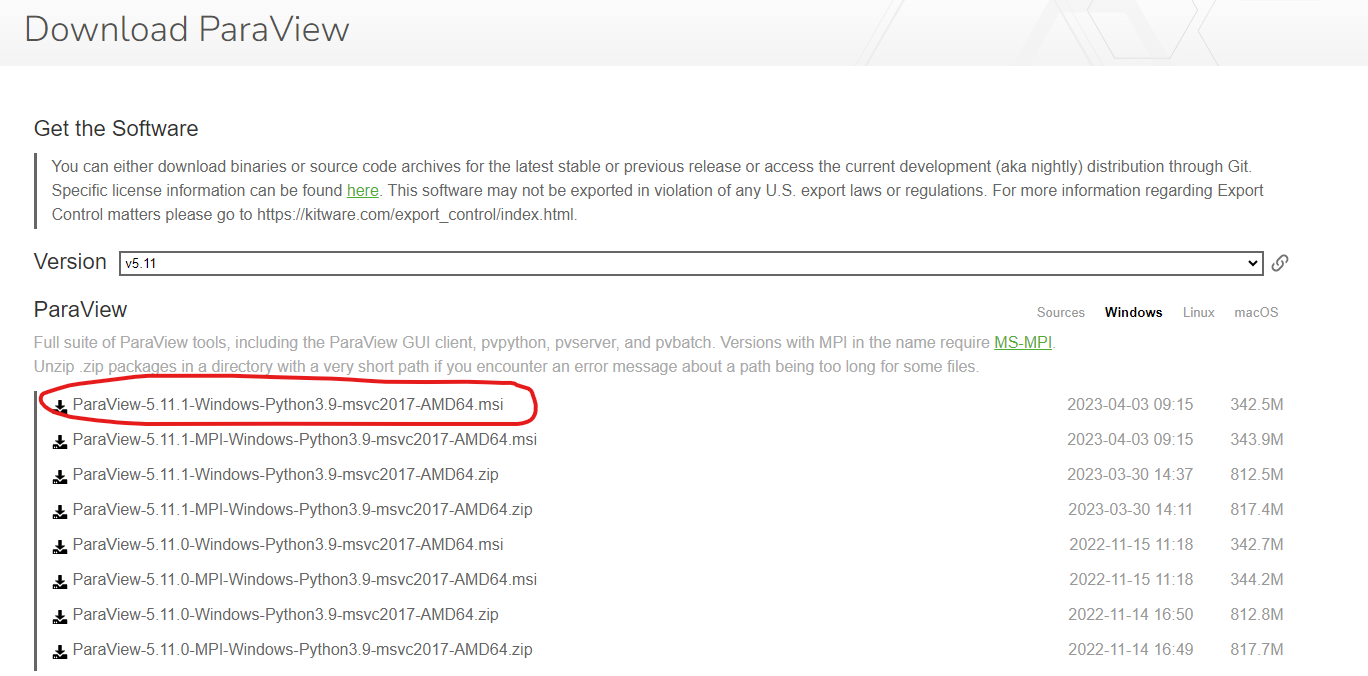 Download ParaView v5.0.1 installation
files.
Start the installation executable and follow the on-screen installation instructions.
After installation ParaView is ready for use to post-process calculation results.
Important note for the first time use of
ParaView
If you use ParaView for the first time after installation, the following
changes are recommended to secure an improved visualisation of the
results.
-
In the ParaView main menu, choose <Edit> <Settings...> as indicated in Figure 1.16 and the "Settings" dialogue box will open.
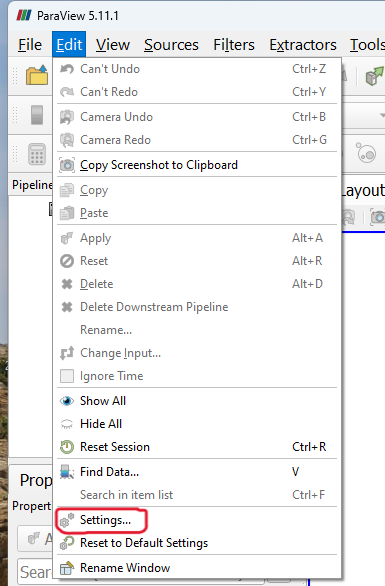 Change settings in ParaView.
Select the tab "Color Palette" as indicated in Figure 1.17
Click on <Select palette to load...> drop down menu and select the option <Print Background> as shown in Figure 1.17.
-
The colours should be updated. Click on <OK> to save the changes.
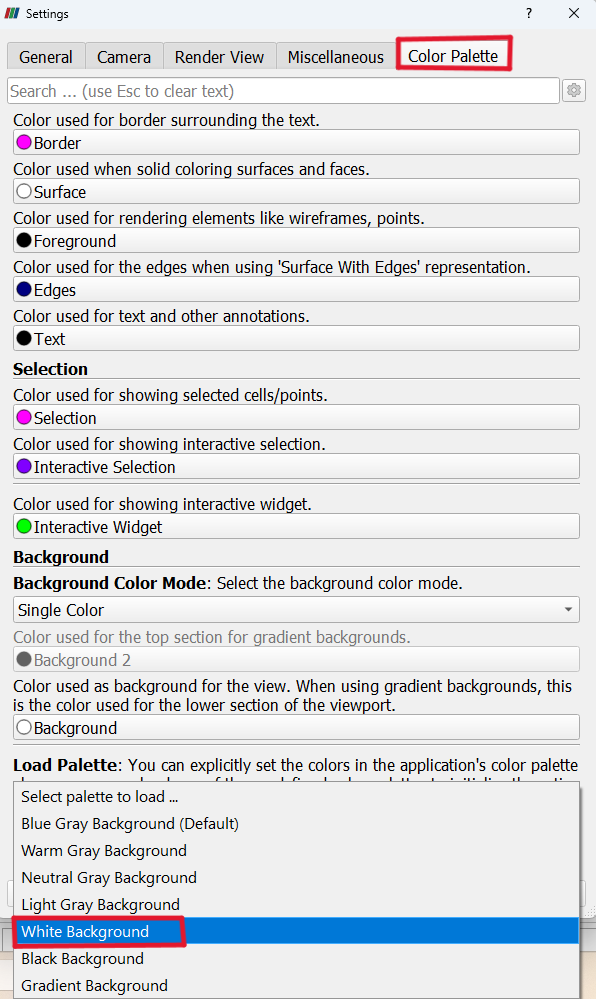 Change of "Color Palette" in
ParaView.
-
Choose <View> from the menu and select the options of the drop down menu as indicated in Figure 1.18.
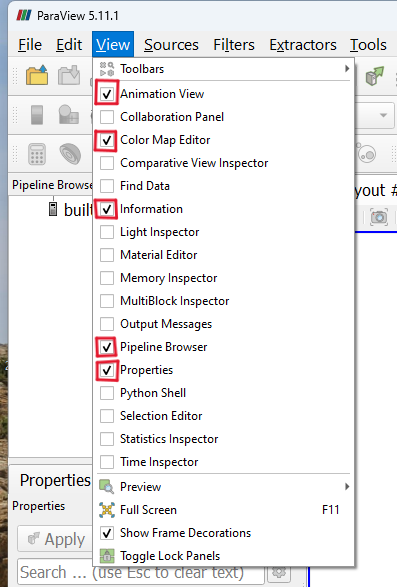 Select "View" options in
ParaView.
This is a one-time action and the choices will be stored as default for any further use of ParaView.