This article will guide you through the process to configure GitHub in preparation for Enterprise-Scale deployments.
-
Create a new GitHub repository from Enterprise-Scale GitHub repo as a template in your GitHub organization.
-
In your new repository (for example,
https://github.com/your-github-id/Enterprise-Scale), create a Personal Access Token (PAT). You can refer to this article for steps on creating a PAT. Onlyrepopermissions are required. -
"User Access Administrator" role is required to grant permission to manage the deployment of your Enterprise-Scale architecture (Step #4). After permission is granted, you can safely disable "User Access Administrator" permission. For more information please follow this article elevated account permissions
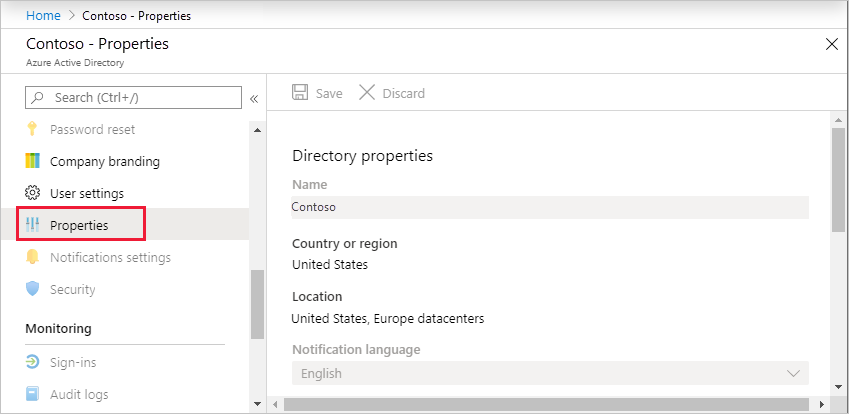
3.1 Sign in to the Azure portal or the Azure Active Directory admin center as a Global Administrator. If you are using Azure AD Privileged Identity Management, activate your Global Administrator role assignment.
3.2 Open Azure Active Directory.
3.3. Under Manage, select Properties.
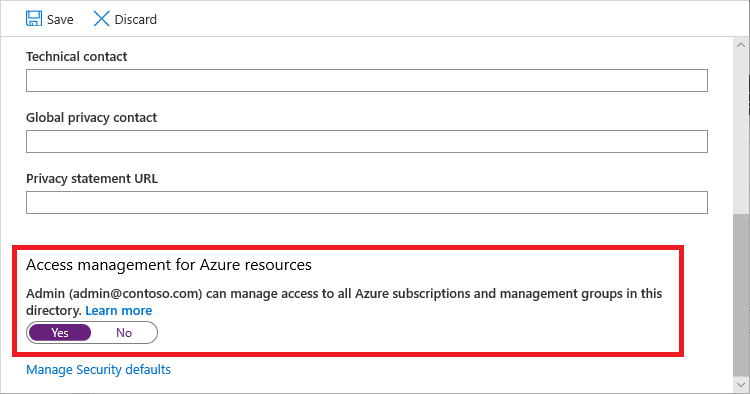
3.4 Under Access management for Azure resources, set the toggle to Yes.
-
Create SPN (same step should be followed for user account used for portal deployment)
"App registration" needs to be enabled on the Azure AD Tenant to self-register an Application (Option 1).
Option 1 (App registration enabled)
#Create Service Principal and assign Owner role to Tenant root scope ("/")
$servicePrincipal = New-AzADServicePrincipal -Role Owner -Scope / -DisplayName AzOps
Option 2 (App registration disabled)
#Create Service Principal as the Azure AD administrator
$servicePrincipal = New-AzADServicePrincipal -Role Owner -Scope / -DisplayName AzOps -SkipAssignment

#Assign Owner role to Tenant root scope ("/") as a User Access Administrator
New-AzRoleAssignment -ApplicationId $servicePrincipal.ApplicationId -RoleDefinitionName Owner -Scope /
Export the SPN information. Perform this step in the same PowerShell instance the SPN was created.
#Prettify output to print in the format for AZURE_CREDENTIALS to be able to copy in next step.
[ordered]@{
    clientId = $servicePrincipal.ApplicationId
    displayName = $servicePrincipal.DisplayName
    name = $servicePrincipal.ServicePrincipalNames[1]
    clientSecret = [System.Net.NetworkCredential]::new("", $servicePrincipal.Secret).Password
    tenantId = (Get-AzContext).Tenant.Id
    subscriptionId = (Get-AzContext).Subscription.Id
} | ConvertTo-Json
Note: It can take up to 15 minutes for newly added permission to reflect for SPN
-
To create the following secrets on GitHub, navigate to the main page of the repository and under your repository name, click Settings, click Secrets, and then click New secret.
-
Name: AZURE_CREDENTIALS
{ "clientId": "<<appId>>", "displayName": "<<redacted>>", "name": "<<redacted>>", "clientSecret": "<<redacted>>", "tenantId": "<<redacted>>", "subscriptionId": "<<default-subscriptionId>>" } -
Name: AZURE_ENROLLMENT_ACCOUNT_NAME [Optional]
This parameter is required if you are planning to create new Subscription though this workflow. This secret must contain the ObjectId for the Azure Enrollment Account. You can obtain the id by running
Get-AzEnrollmentAccountObjectId
- Add upstream repo to your local repository to get latest changes
Follow these steps in order to synchronize the latest changes from the upstream repo into your local repositories.
Run the following git commands once you change your directory to your local fork to add a reference to the upstream repo
git remote -v
git remote add upstream https://github.com/Azure/Enterprise-scale.git
git remote -v
Execute the following git commands when you want to synchronize changes from upstream repo into your local fork:
git fetch upstream
git pull upstream main --allow-unrelated-histories