作为系列文章的第十二篇,本篇将通过 scope_model 、 BloC 设计模式、flutter_redux 、 fish_redux 来全面深入分析, Flutter 中大家最为关心的状态管理机制,理解各大框架中如何设计实现状态管理,从而选出你最为合适的 state “大管家”。
在所有 响应式编程 中,状态管理一直老生常谈的话题,而在 Flutter 中,目前主流的有 scope_model 、BloC 设计模式 、flutter_redux 、fish_redux 等四种设计,它们的 复杂度 和 上手难度 是逐步递增的,但同时 可拓展性 、解耦度 和 复用能力 也逐步提升。
基于前篇,我们对 Stream 已经有了全面深入的理解,后面可以发现这四大框架或多或少都有 Stream 的应用,不过还是那句老话,合适才是最重要,不要为了设计而设计 。
scoped_model 是 Flutter 最为简单的状态管理框架,它充分利用了 Flutter 中的一些特性,只有一个 dart 文件的它,极简的实现了一般场景下的状态管理。
如下方代码所示,利用 scoped_model 实现状态管理只需要三步 :
- 定义
Model的实现,如CountModel,并且在状态改变时执行notifyListeners()方法。 - 使用
ScopedModelWidget 加载Model。 - 使用
ScopedModelDescendant或者ScopedModel.of<CountModel>(context)加载Model内状态数据。
是不是很简单?那仅仅一个 dart 文件,如何实现这样的效果的呢?后面我们马上开始剥析它。
class ScopedPage extends StatelessWidget {
  final CountModel _model = new CountModel();

  @override
  Widget build(BuildContext context) {
    return Scaffold(
        appBar: AppBar(
          title: new Text("scoped"),
        ),
        body: Container(
          child: new ScopedModel<CountModel>(
            model: _model,
            child: CountWidget(),
          ),
        ));
  }
}

class CountWidget extends StatelessWidget {
  @override
  Widget build(BuildContext context) {
    return new ScopedModelDescendant<CountModel>(
        builder: (context, child, model) {
        return new Column(
          children: <Widget>[
            new Expanded(child: new Center(child: new Text(model.count.toString()))),
            new Center(
              child: new FlatButton(
                  onPressed: () {
                    model.add();
                  },
                  color: Colors.blue,
                  child: new Text("+")),
            ),
          ],
        );
      });
  }
}

class CountModel extends Model {
  static CountModel of(BuildContext context) =>
      ScopedModel.of<CountModel>(context);

  int _count = 0;

  int get count => _count;

  void add() {
    _count++;
    notifyListeners();
  }
}
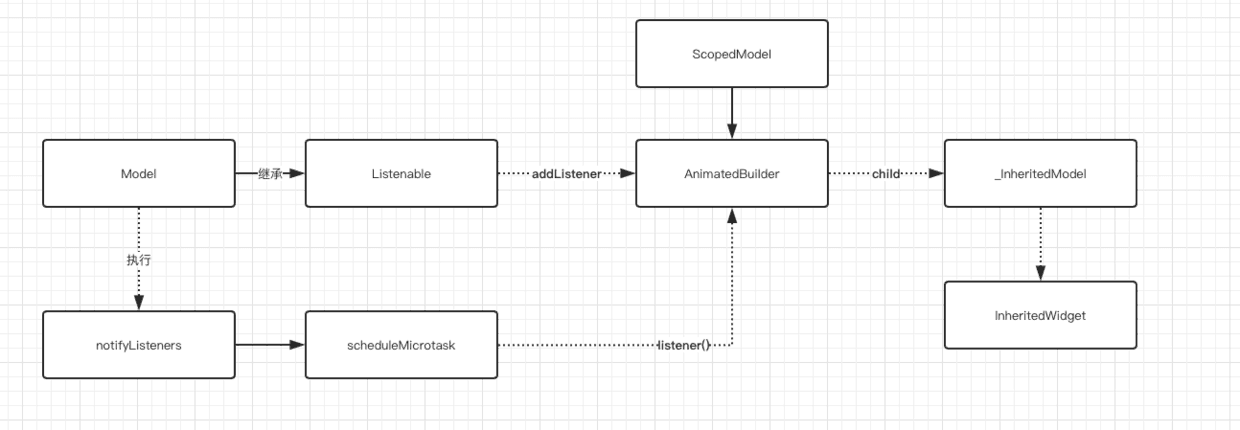
如下图所示,在 scoped_model 的整个实现流程中,ScopedModel 这个 Widget 很巧妙的借助了 AnimatedBuildler 。
因为 AnimatedBuildler 继承了 AnimatedWidget ,在 AnimatedWidget 的生命周期中会对 Listenable 接口添加监听,而 Model 恰好就实现了 Listenable 接口,整个流程总结起来就是:
Model实现了Listenable接口,内部维护一个Set<VoidCallback> _listeners。- 当
Model设置给AnimatedBuildler时,Listenable的addListener会被调用,然后添加一个_handleChange监听到_listeners这个 Set 中。 - 当
Model调用notifyListeners时,会通过异步方法scheduleMicrotask去从头到尾执行一遍_listeners中的_handleChange。 _handleChange监听被调用,执行了setState({})。
整个流程是不是很巧妙,机制的利用了 AnimatedWidget 和 Listenable 在 Flutter 中的特性组合,至于 ScopedModelDescendant 就只是为了跨 Widget 共享 Model 而做的一层封装,主要还是通过 ScopedModel.of<CountModel>(context) 获取到对应 Model 对象,这这个实现上,scoped_model 依旧利用了 Flutter 的特性控件 InheritedWidget 实现。
在 scoped_model 中我们可以通过 ScopedModel.of<CountModel>(context) 获取我们的 Model ,其中最主要是因为其内部的 build 的时候,包裹了一个 _InheritedModel 控件,而它继承了 InheritedWidget 。
为什么我们可以通过 context 去获取到共享的 Model 对象呢?
首先我们知道 context 只是接口,而在 Flutter 中 context 的实现是 Element ,在 Element 的 inheritFromWidgetOfExactType 方法实现里,有一个 Map<Type, InheritedElement> _inheritedWidgets 的对象。
_inheritedWidgets 一般情况下是空的,只有当父控件是 InheritedWidget 或者本身是 InheritedWidgets 时才会有被初始化,而当父控件是 InheritedWidget 时,这个 Map 会被一级一级往下传递与合并 。
所以当我们通过 context 调用 inheritFromWidgetOfExactType 时,就可以往上查找到父控件的 Widget,从在 scoped_model 获取到 _InheritedModel 中的Model 。
BloC 全称 Business Logic Component ,它属于一种设计模式,在 Flutter 中它主要是通过 Stream 与 SteamBuilder 来实现设计的,所以 BloC 实现起来也相对简单,关于 Stream 与 SteamBuilder 的实现原理可以查看前篇,这里主要展示如何完成一个简单的 BloC 。
如下代码所示,整个流程总结为:
- 定义一个
PageBloc对象,利用StreamController创建Sink与Stream。 PageBloc对外暴露Stream用来与StreamBuilder结合;暴露 add 方法提供外部调用,内部通过Sink更新Stream。- 利用
StreamBuilder加载监听Stream数据流,通过 snapShot 中的 data 更新控件。
当然,如果和 rxdart 结合可以简化 StreamController 的一些操作,同时如果你需要利用 BloC 模式实现状态共享,那么自己也可以封装多一层 InheritedWidgets 的嵌套,如果对于这一块有疑惑的话,推荐可以去看看上一篇的 Stream 解析。
class _BlocPageState extends State<BlocPage> {
  final PageBloc _pageBloc = new PageBloc();
  @override
  void dispose() {
    _pageBloc.dispose();
    super.dispose();
  }
  @override
  Widget build(BuildContext context) {
    return Scaffold(
      body: Container(
        child: new StreamBuilder(
            initialData: 0,
            stream: _pageBloc.stream,
            builder: (context, snapShot) {
              return new Column(
                children: <Widget>[
                  new Expanded(
                      child: new Center(
                          child: new Text(snapShot.data.toString()))),
                  new Center(
                    child: new FlatButton(
                        onPressed: () {
                          _pageBloc.add();
                        },
                        color: Colors.blue,
                        child: new Text("+")),
                  ),
                  new SizedBox(
                    height: 100,
                  )
                ],
              );
            }),
      ),
    );
  }
}
class PageBloc {
  int _count = 0;
  ///StreamController
  StreamController<int> _countController = StreamController<int>();
  ///对外提供入口
  StreamSink<int> get _countSink => _countController.sink;
  ///提供 stream StreamBuilder 订阅
  Stream<int> get stream => _countController.stream;
  void dispose() {
    _countController.close();
  }
  void add() {
    _count++;
    _countSink.add(_count);
  }
}
相信如果是前端开发者,对于 redux 模式并不会陌生,而 flutter_redux 可以看做是利用了 Stream 特性的 scope_model 升级版,通过 redux 设计模式来完成解耦和拓展。
当然,更多的功能和更好的拓展性,也造成了代码的复杂度和上手难度 ,因为 flutter_redux 的代码使用篇幅问题,这里就不展示所有代码了,需要看使用代码的可直接从 demo 获取,现在我们直接看 flutter_redux 是如何实现状态管理的吧。
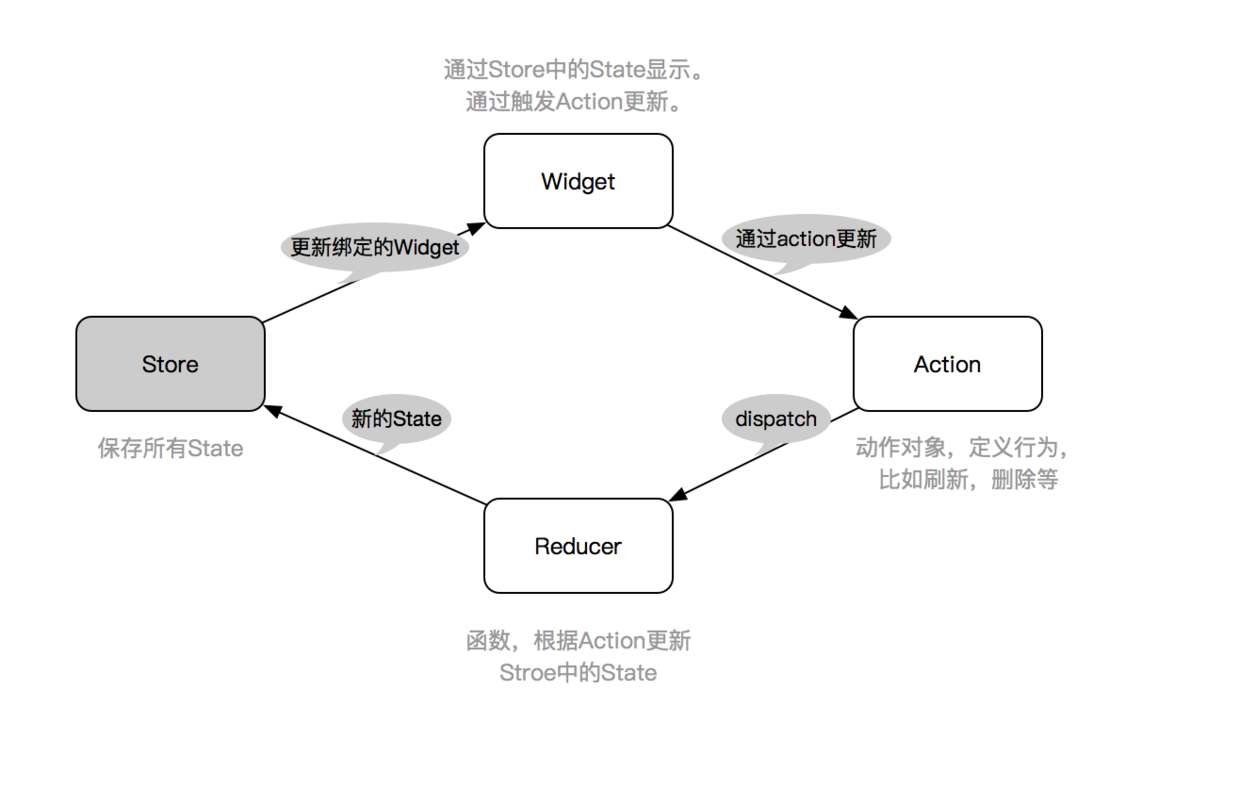
如上图,我们知道 redux 中一般有 Store 、 Action 、 Reducer 三个主要对象,之外还有 Middleware 中间件用于拦截,所以如下代码所示:
- 创建
Store用于管理状态 。 - 给
Store增加appReducer合集方法,增加需要拦截的middleware,并初始化状态。 - 将
Store设置给StoreProvider这个InheritedWidget。 - 通过
StoreConnector/StoreBuilder加载显示Store中的数据。
之后我们可以 dispatch 一个 Action ,在经过 middleware 之后,触发对应的 Reducer 返回数据,而事实上这里核心的内容实现,还是 Stream 和 StreamBuilder 的结合使用 ,接下来就让我们看看这个流程是如何联动起来的吧。
class _ReduxPageState extends State<ReduxPage> {

  ///初始化store
  final store = new Store<CountState>(
    /// reducer 合集方法
    appReducer,
    ///中间键
    middleware: middleware,
    ///初始化状态
    initialState: new CountState(count: 0),
  );

  @override
  Widget build(BuildContext context) {
    return Scaffold(
        appBar: AppBar(
          title: new Text("redux"),
        ),
        body: Container(
          /// StoreProvider InheritedWidget
          /// 加载 store 共享
          child: new StoreProvider(
            store: store,
            child: CountWidget(),
          ),
        ));
  }
}
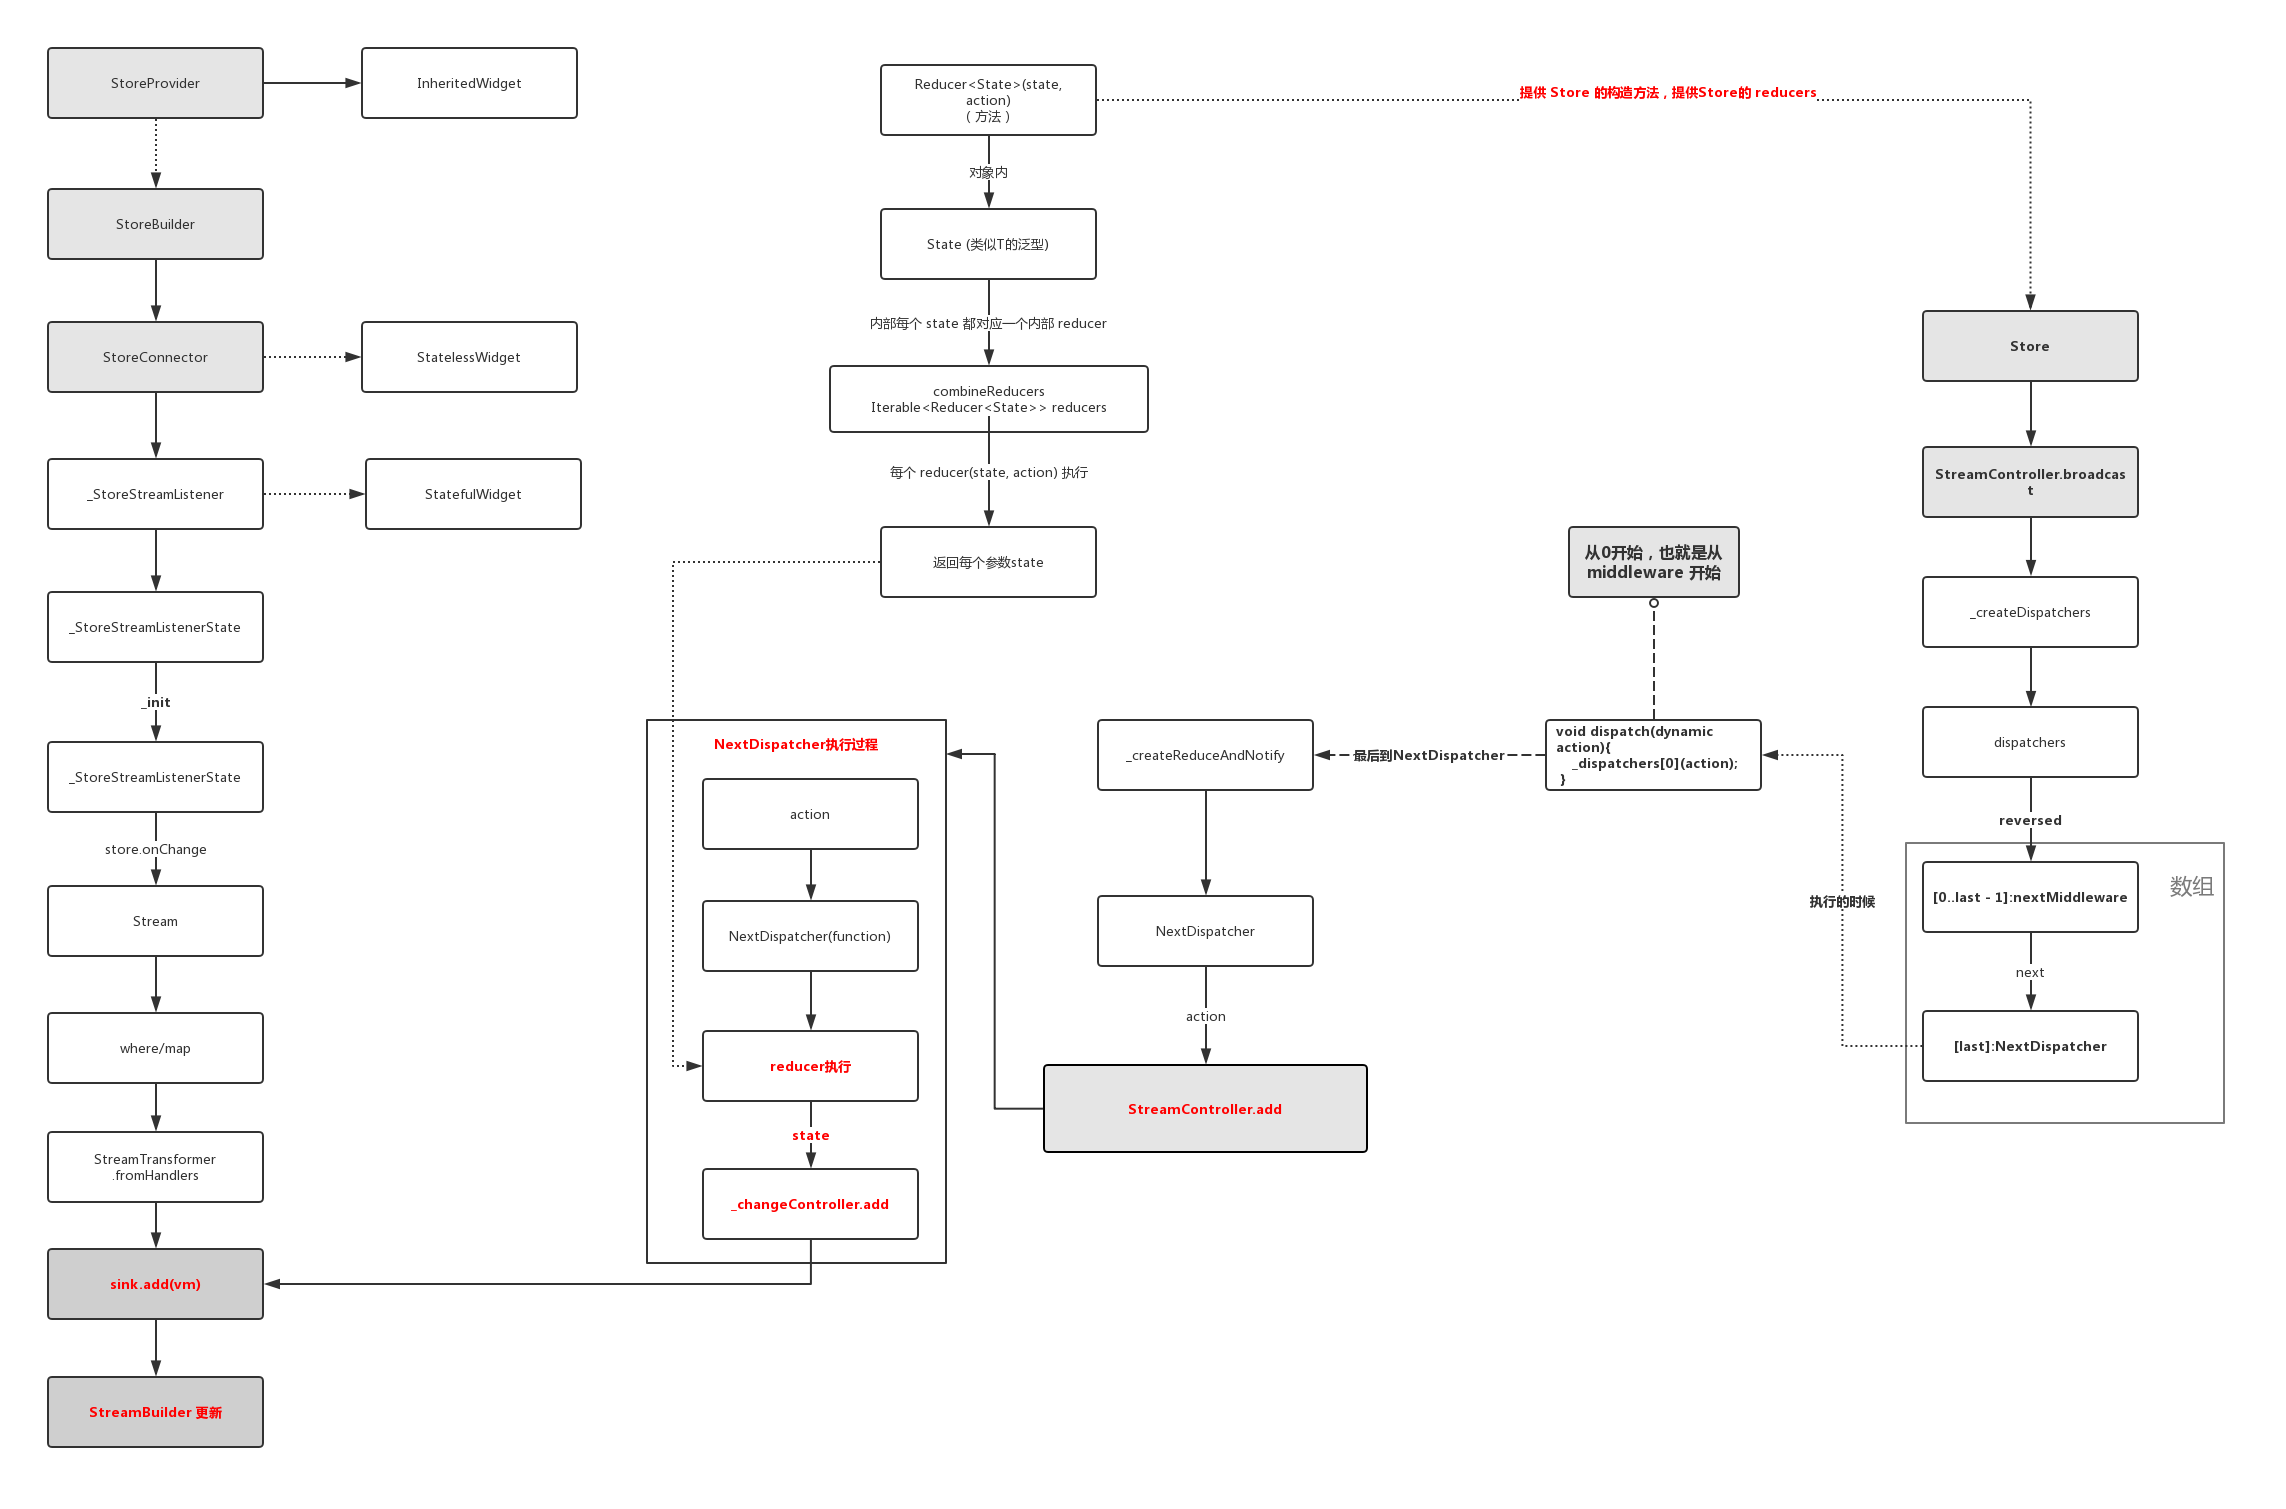
如下图所示,是 flutter_redux 从入口到更新的完整流程图,整理这个流程其中最关键有几个点是:
StoreProvider是InheritedWidgets,所以它可以通过context实现状态共享。StreamBuilder/StoreConnector的内部实现主要是StreamBuilder。Store内部是通过StreamController.broadcast创建的Stream,然后在StoreConnector中通过Stream的map、transform实现小状态的变换,最后更新到StreamBuilder。
那么现在看下图流程有点晕?下面我们直接分析图中流程。
可以看出整个流程的核心还是 Stream ,基于这几个关键点,我们把上图的流程整理为:
- 1、
Store创建时传入reducer对象和middleware数组,同时通过StreamController.broadcast创建了_changeController对象。 - 2、
Store利用middleware和_changeController组成了一个NextDispatcher方法数组 ,并把_changeController所在的NextDispatcher方法放置在数组最后位置。 - 3、
StoreConnector内通过Store的_changeController获取Stream,并进行了一系列变换后,最终Stream设置给了StreamBuilder。 - 4、当我们调用
Stroe的dispatch方法时,我们会先进过NextDispatcher数组中的一系列middleware拦截器,最终调用到队末的_changeController所在的NextDispatcher。 - 5、最后一个
NextDispatcher执行时会先执行reducer方法获取新的state,然后通过_changeController.add将状态加载到Stream流程中,触发StoreConnector的StreamBuilder更新数据。
如果对于
Stream流程不熟悉的还请看上篇。
现在再对照流程图会不会清晰很多了?
在 flutter_redux 中,开发者的每个操作都只是一个 Action ,而这个行为所触发的逻辑完全由 middleware 和 reducer 决定,这样的设计在一定程度上将业务与UI隔离,同时也统一了状态的管理。
比如你一个点击行为只是发出一个
RefrshAction,但是通过middleware拦截之后,在其中异步处理完几个数据接口,然后重新dispatch出Action1、Action2、Action3去更新其他页面, 类似的redux_epics库就是这样实现异步的middleware逻辑。
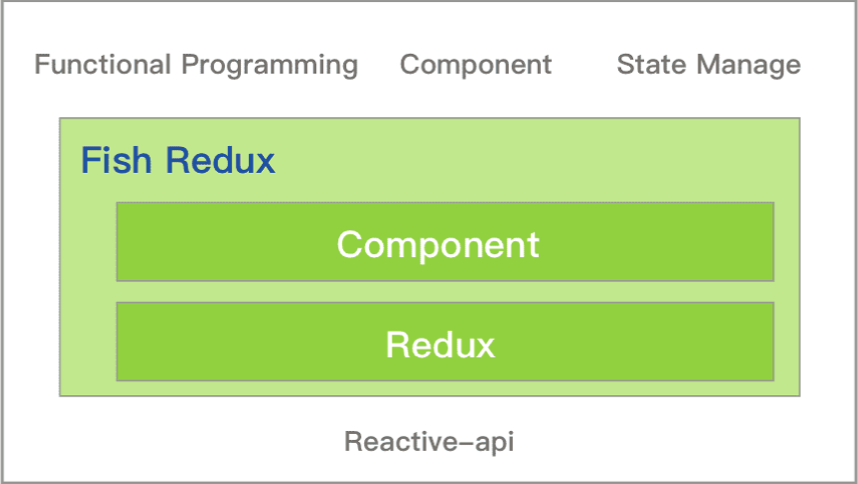
如果说 flutter_redux 属于相对复杂的状态管理设置的话,那么闲鱼开源的 fish_redux 可谓 “不走寻常路” 了,虽然是基于 redux 原有的设计理念,同时也有使用到 Stream ,但是相比较起来整个设计完全是 超脱三界,如果是前面的都是简单的拼积木,那是 fish_redux 就是积木界的乐高。
因为篇幅原因,这里也只展示部分代码,其中 reducer 还是我们熟悉的存在,而闲鱼在这 redux 的基础上提出了 Comoponent 的概念,这个概念下 fish_redux 是从 Context 、Widget 等地方就开始全面“入侵”你的代码,从而带来“超级赛亚人”版的 redux 。
如下代码所示,默认情况我们需要:
- 继承
Page实现我们的页面。 - 定义好我们的
State状态。 - 定义
effect、middleware、reducer用于实现副作用、中间件、结果返回处理。 - 定义
view用于绘制页面。 - 定义
dependencies用户装配控件,这里最骚气的莫过于重载了 + 操作符,然后利用Connector从State挑选出数据,然后通过Component绘制。
现在看起来使用流程是不是变得复杂了?
但是这带来的好处就是 复用的颗粒度更细了,装配和功能更加的清晰。 那这个过程是如何实现的呢?后面我们将分析这个复杂的流程。
class FishPage extends Page<CountState, Map<String, dynamic>> {
  FishPage()
      : super(
          initState: initState,
          effect: buildEffect(),
          reducer: buildReducer(),
          ///配置 View 显示
          view: buildView,
          ///配置 Dependencies 显示
          dependencies: Dependencies<CountState>(
              slots: <String, Dependent<CountState>>{
                ///通过 Connector() 从 大 state 转化处小 state
                ///然后将数据渲染到 Component
                'count-double': DoubleCountConnector() + DoubleCountComponent()
              }
          ),
          middleware: <Middleware<CountState>>[
            ///中间键打印log
            logMiddleware(tag: 'FishPage'),
          ]
  );
}

///渲染主页
Widget buildView(CountState state, Dispatch dispatch, ViewService viewService) {
  return Scaffold(
      appBar: AppBar(
        title: new Text("fish"),
      ),
      body: new Column(
        children: <Widget>[
          ///viewService 渲染 dependencies
          viewService.buildComponent('count-double'),
          new Expanded(child: new Center(child: new Text(state.count.toString()))),
          new Center(
            child: new FlatButton(
                onPressed: () {
                  ///+
                  dispatch(CountActionCreator.onAddAction());
                },
                color: Colors.blue,
                child: new Text("+")),
          ),
          new SizedBox(
            height: 100,
          )
        ],
      ));
}
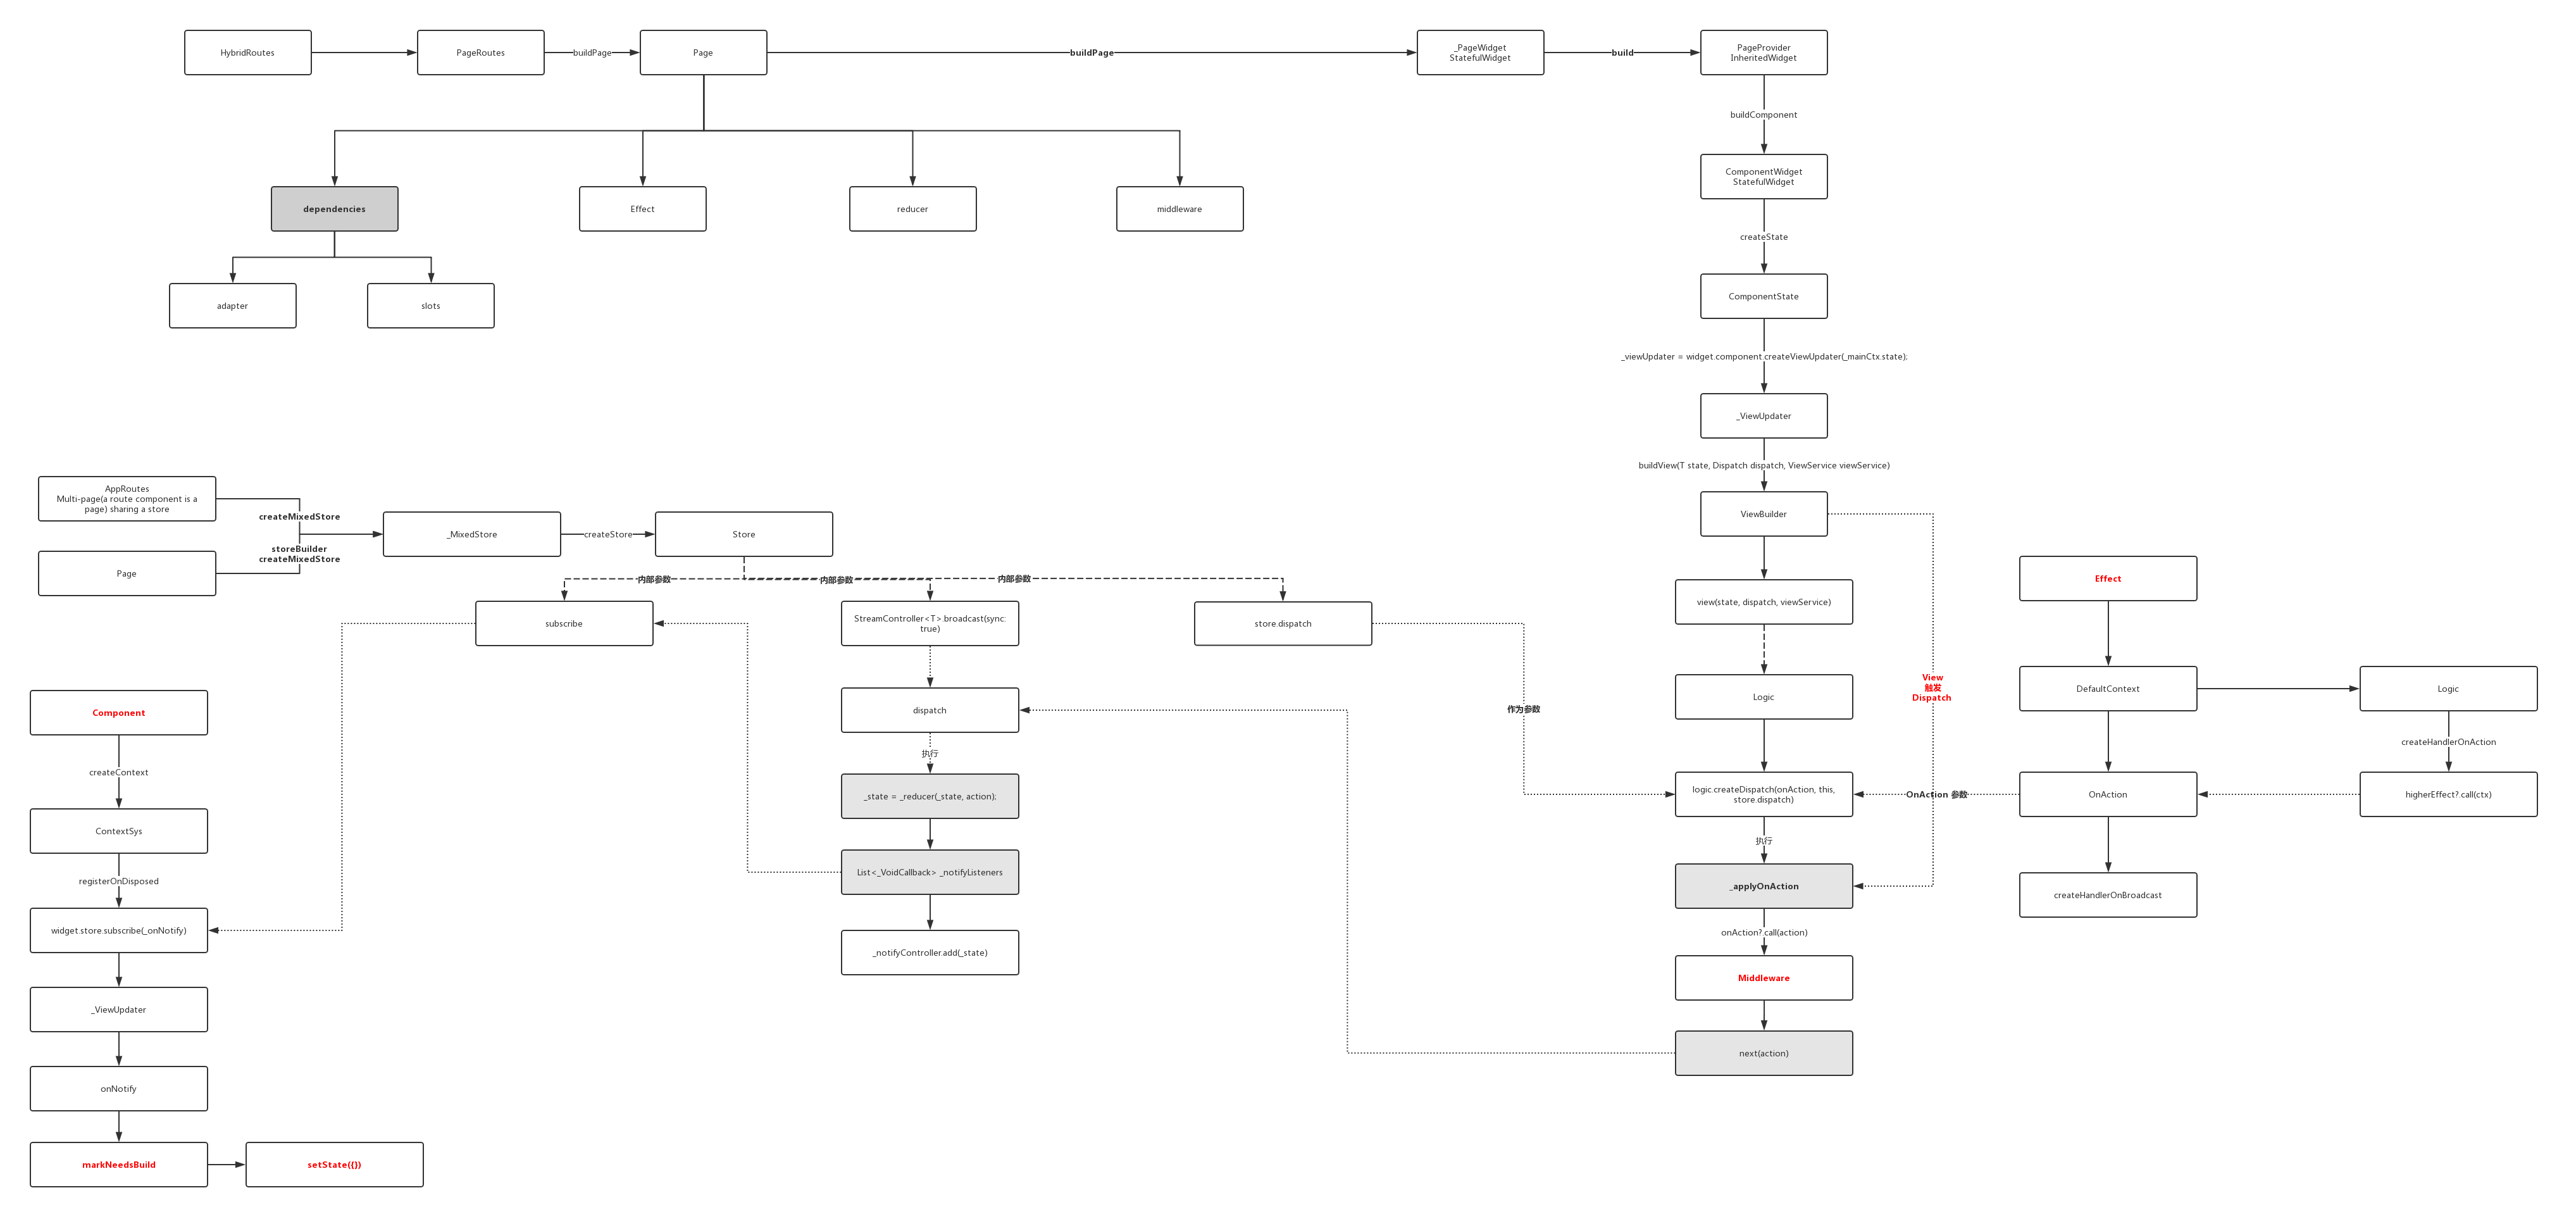
如下大图所示,整个联动的流程比 flutter_redux 复杂了更多( 如果看不清可以点击大图 ),而这个过程我们总结起来就是:
-
1、
Page的构建需要State、Effect、Reducer、view、dependencies、middleware等参数。 -
2、
Page的内部PageProvider是一个InheritedWidget用户状态共享。 -
3、
Page内部会通过createMixedStore创建Store对象。 -
4、
Store对象对外提供的subscribe方法,在订阅时会将订阅的方法添加到内部List<_VoidCallback> _listeners。 -
5、
Store对象内部的StreamController.broadcast创建出了_notifyController对象用于广播更新。 -
6、
Store对象内部的subscribe方法,会在ComponentState中添加订阅方法onNotify,如果调用在onNotify中最终会执行setState更新UI。 -
7、
Store对象对外提供的dispatch方法,执行时内部会执行 4 中的List<_VoidCallback> _listeners,触发onNotify。 -
8、
Page内部会通过Logic创建Dispatch,执行时经历Effect->Middleware->Stroe.dispatch->Reducer->State->_notifyController->_notifyController.add(state)等流程。 -
9、以上流程最终就是
Dispatch触发Store内部_notifyController, 最终会触发ComponentState中的onNotify中的setState更新UI
是不是有很多对象很陌生?
确实 fish_redux 的整体流程更加复杂,内部的 ContxtSys 、Componet 、ViewSerivce 、 Logic 等等概念设计,这里因为篇幅有限就不详细拆分展示了,但从整个流程可以看出 fish_redux 从控件到页面更新,全都进行了新的独立设计,而这里面最有意思的,莫不过 dependencies 。
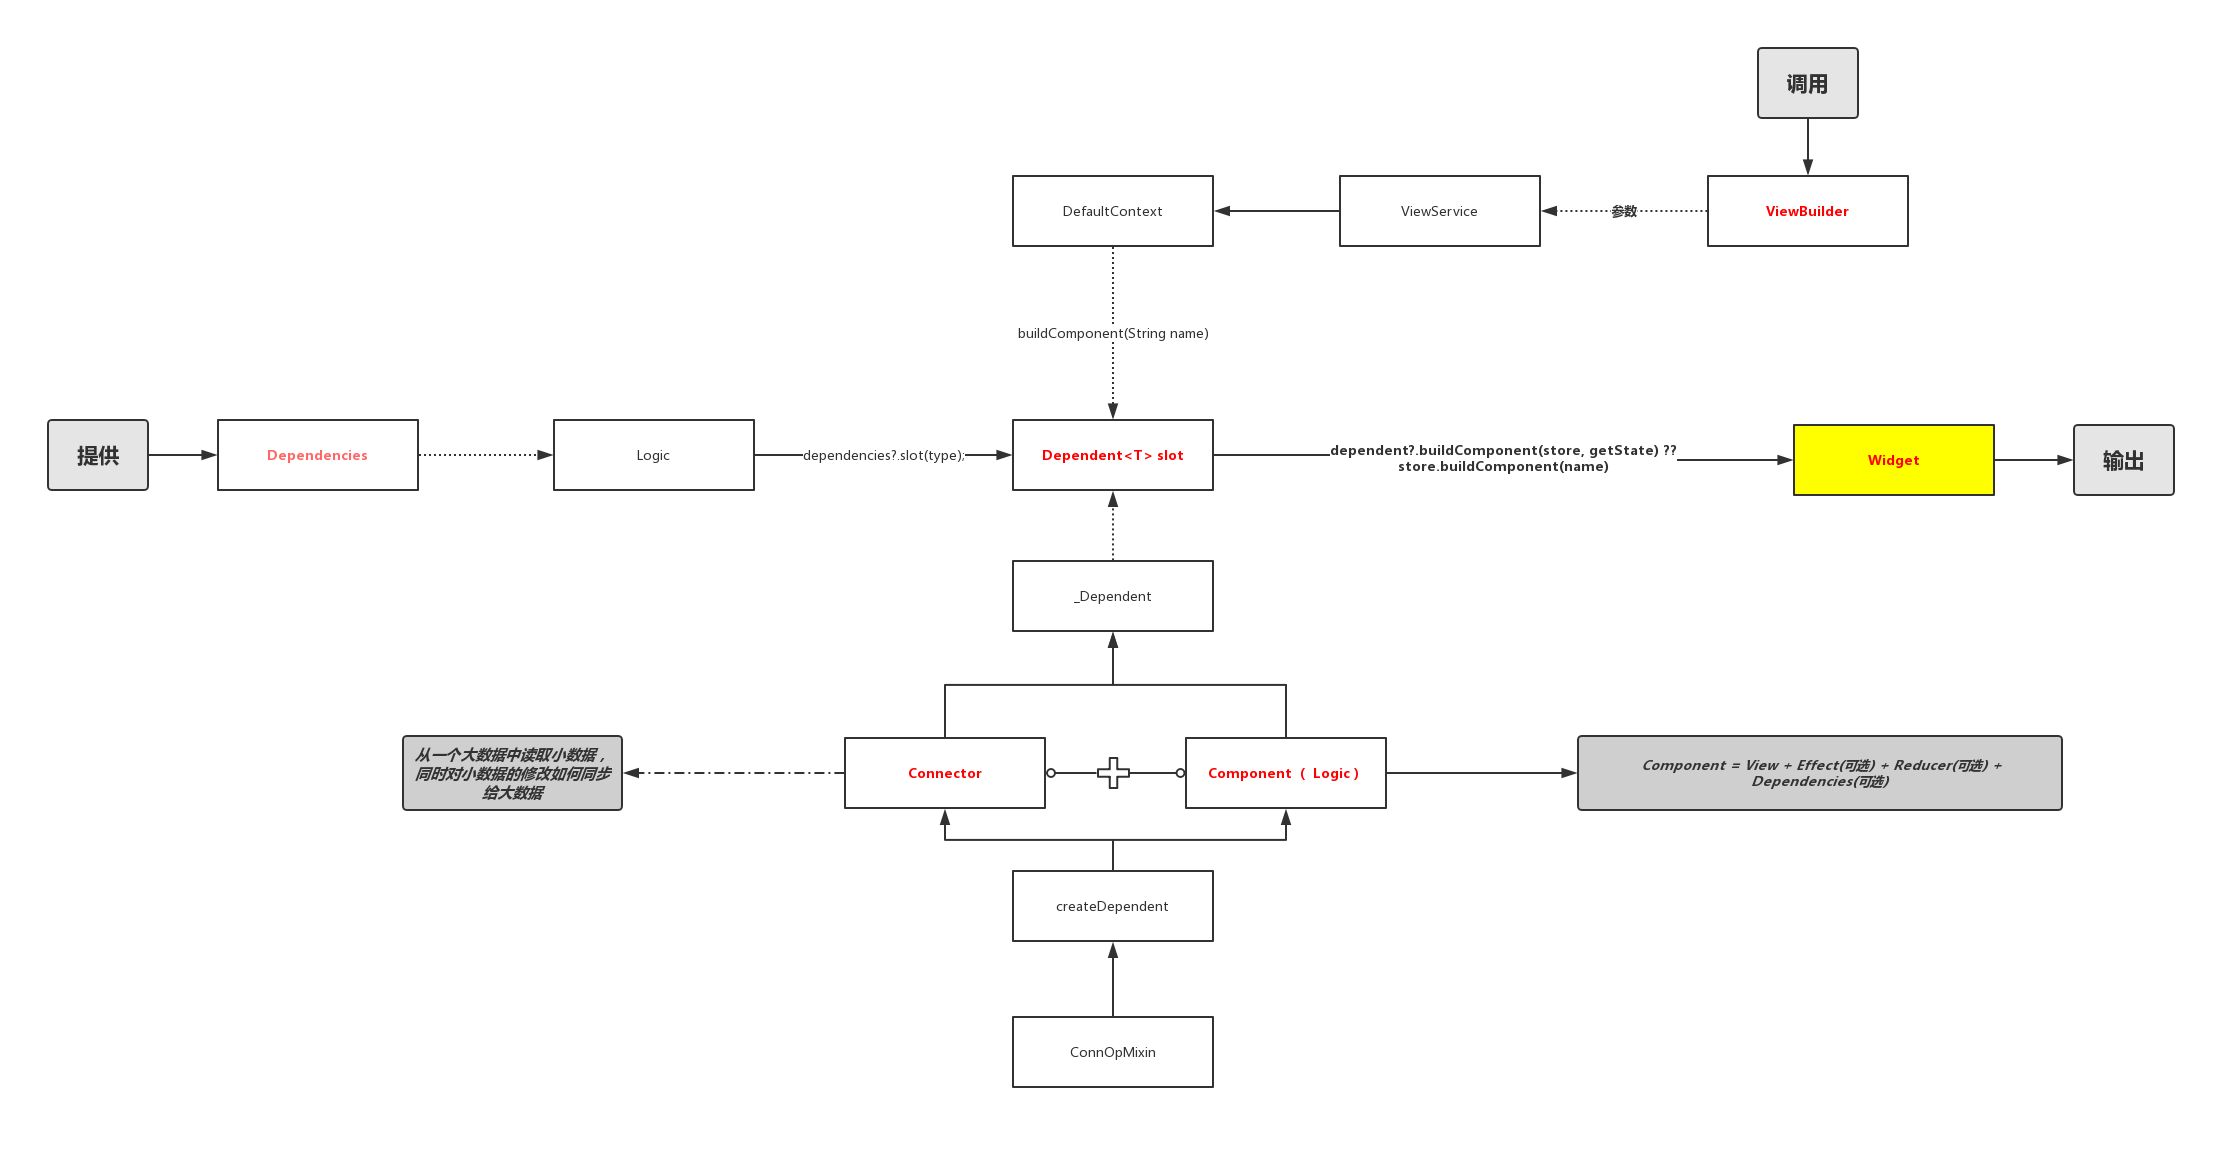
如下图所示,得益于fish_redux 内部 ConnOpMixin 中对操作符的重载,我们可以通过 DoubleCountConnector() + DoubleCountComponent() 来实现Dependent 的组装。
Dependent 的组装中 Connector 会从总 State 中读取需要的小 State 用于 Component 的绘制,这样很好的达到了 模块解耦与复用 的效果。
而使用中我们组装的 dependencies 最后都会通过 ViewService 提供调用调用能力,比如调用 buildAdapter 用于列表能力,调用 buildComponent 提供独立控件能力等。
可以看出 flutter_redux 的内部实现复杂度是比较高的,在提供组装、复用、解耦的同时,也对项目进行了一定程度的入侵,这里的篇幅可能不能很全面的分析 flutter_redux 中的整个流程,但是也能让你理解整个流程的关键点,细细品味设计之美。
自此,第十二篇终于结束了!(///▽///)
- 本文Demo :https://github.com/CarGuo/state_manager_demo
- Github : https://github.com/CarGuo/
- 开源 Flutter 完整项目:https://github.com/CarGuo/GSYGithubAppFlutter
- 开源 Flutter 多案例学习型项目: https://github.com/CarGuo/GSYFlutterDemo
- 开源 Fluttre 实战电子书项目:https://github.com/CarGuo/GSYFlutterBook
