After deployment, your BTCPay Server needs to sync the blockchain. Depending on your machine configuration, bandwidth and the number of altcoins you added, this process usually takes between 1-7 days.
There's nothing you can do to bypass it. It may seem tedious, but it's a critical step of running your own full node and not having to trust or relay to anyone.
You will see the pop-up message showing the sync progress. When your node fully syncs, the pop-up will disappear.

The first created account on your newly-created BTCPay Server is automatically an admin. You can register your admin account even if your node is not fully synced.
To register, visit your BTCPay Server URL and click on the "Register" in the upper menu. Input your password and e-mail and click "Register" button. You will automatically be logged in. If you're using a third-party host, you may be asked to verify your e-mail address.
When logged in, go to > Stores in the upper navigation menu and create a new store. You can create an unlimited number of stores on BTCPay Server.

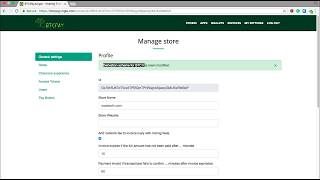
Store > Settings provide basis control over individual store settings. Modify the confirmations, invoice expiry and more.
The process of connecting a wallet and your BTCPay server is the same for both third-party or self-hosted solution. Your private keys are never uploaded nor required by the BTCPay Server. You’re only uploading the xpubkey, never private key.
There are two ways in which you can connect your BTCPay to your wallet:
- Automatic with Ledger Nano S hardware wallet
- Manual with any wallet supporting xpubkey (Electrum recommended)
Watch the video below or read this article for step by step instructions.
BTCPay has a POS app which you can use to receive payments from your customers directly or to receive donations. To create the POS app, you need to have a store created in BTCPay.

- Go to > Apps
- Create a new App
- Add a name for your app (ex "My awesome POS."
- Customize your POS
- Submit query.
- Click view to preview your POS
Pay buttons are great when you have a fixed amount for a product or a donation. You can easily embed the button into HTML. When the customer or a visitor clicks on the button, BTCPay will display a checkout page and an invoice for them.

- Go to > Store > Settings > Pay Button
- Allow anyone to create invoices
- Customize your button
- Copy the generated form and embed it on your website.
Depending on the CMS you're using, you can easily connect BTCPay to your online store. Currently, BTCPay offers following integrations :