-
Notifications
You must be signed in to change notification settings - Fork 2.9k
Getting source code & installation
In this tutorial, we'll implement a simple distributed chat application.
In this section, we will directly obtain the source code from github, and then make it run. Of course, you can use pomelo init to get a project template and then fill the code into the template.
The source code of the distributed chat application is on github, using the following commands to clone:
$ git clone https://github.com/NetEase/chatofpomelo-websocket.git
$ cd chatofpomelo-websocket/
$ git checkout tutorial-starter
This is a very simple application, and its source code structure is shown below:

All the game business logic code is in game-server directory, and the file app.js is the entrance of the server. It can be seen from the figure above that there are three subdirectories in servers directory: gate, connector and chat. As pomelo uses the file path to distinguish the type of servers, so these three directories represent three different types of servers, we can define handlers, remotes for each type of servers and the defined handlers and remotes to determine the behavior of the server.
-
gate server, its logic code is in gateHandler.js and it accepts the request from clients and return a certain address (host, port) of a connector server which can be connected by clients;
-
connector server, its logic code is in entryHandler.js and it is mainly to accept the client's requests and route them to chat server, maintain the connections with clients;
-
chat server, it has both handler and remote definitions and the handler is to handle request
sendwhile the remote runs as a remote service for connector's RPC invocation.
The config subdirectory in the game-server directory is used to contain the configuration files for the application, including logs configuration information, master server and other application servers configuration information. You can also place other configuration in this directory, such as database configuration information and so on.
The logs subdirectory in game-server contains all running logs.
As the client platform for this chat application is web, so it requires a web server. We will pay more attention on server-side logic and functionalities in this tutorial, for the client, we almost do not need to modify its code, the default works well.
First, make sure you have successfully installed pomelo, and run the following command to install dependencies :
$ sh npm-install.sh
Start the game server:
$ cd game-server
$ pomelo start
Start the web server :
$ cd web-server
$ node app.js
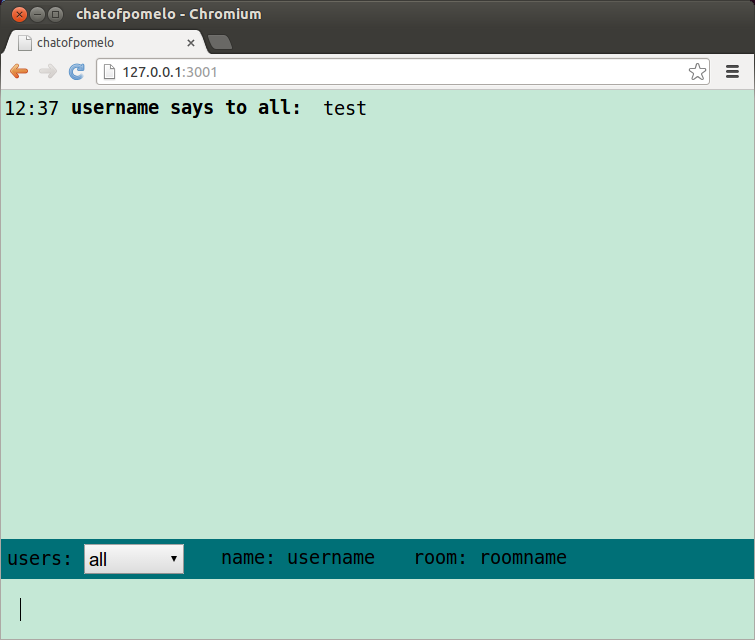
If all work well, then we can try our chat service. Go to http://127.0.0.1:3001/index.html and enter a username and a room name to join in the chat. You can launch more than one chat client instance to test the chat application, the effect is as follows:

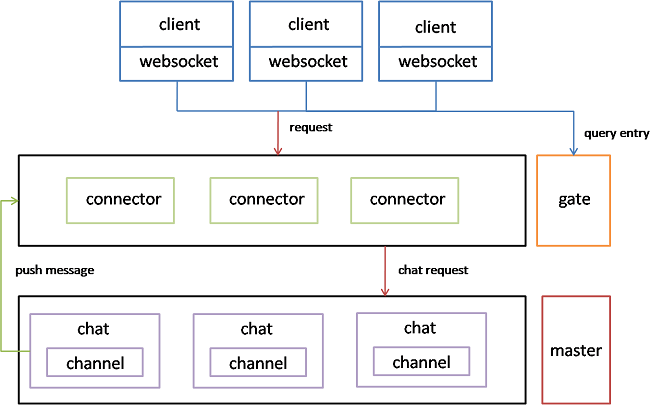
Running architecture of the chat application is shown below:

In this architecture, the front-end server namely connector is responsible for accepting connection from clients and the backend server namely chat server will execute the business logic.
This architecture has the following advantages:
-
Load separation: The architecture totally separate the connection code from the business logic code, and it is necessary especially in broadcast-intensive applications(such as games and chat). Intensive broadcast and network communications will consume lots of resource, and after separating, the processing ability of business logic will not be impacted by broadcasting.
-
Simplify channel switch: Users can switch channels or rooms without reconnecting because of the separated architecture.
-
Better Scalability : We can launch more connector server to deal with the increasing of users.
The logic in client side includes:
- Entering a chat room: connecting to server with username and room;
- Speaking in a chat room: sending a speaking request to server;
- Responding to speaking of other users in the same room: displaying the content of the speaking.
- Exiting: disconnecting from server and cleaning up.
First, client will query an available connector server address (host, addr) from gate server, and gate server will handle it. The detailed code is in web-server/public/js/client.js, and here just a sample code:
fuction queryEntry(uid, callback) {
  var route = 'gate.gateHandler.queryEntry';
  // ...
}

$("#login").click(function() {
  username = $("#loginUser").attr("value");
  rid = $('#channelList').val();

  // ...

  // query entry of connection
  queryEntry(username, function(host, port) {
    pomelo.init({
      host: host,
      port: port,
      log: true
    }, function() {
         // ...
    });
  }) ;
});
After querying connector address (host, port), it will login to connector server by sending a request with the username and room id, as follows:
pomelo.request('connector.entryHandler.enter',
               {username: username, rid: rid},
               function() {
    // ...
});
When speaking, it will request service chat.chatHandler.send, as follows:
pomelo.request('chat.chatHandler.send',
               {content: msg, from: username, target: msg.target},
               function(data) {
  // ...
});
If someone in the same room leaving, joining or speaking, it will receive these action information pushed by server side. In client side, it uses a callback way, as follows:
pomelo.on ('onAdd', function(data) {
  // ...
});

pomelo.on ('onLeave', function(data) {
  // ...
});

pomelo.on ('onChat', function(data) {
  // ...
});
The detailed client code is in web-server/public/js/client.js, and it uses [component] (https://github.com/component/component) to manage the javascript code in client side.
As we know, in pomelo, as long as the definition of handler and remote for a server is determined, then behavior of the server is determined. In this example, there are three type servers: gate, connector, chat, and the logic they do are as follows :
- Gate server handles the request from client to query an available connector address. Here, we just configure only one connector server for simplication, so just return the connector's address, the code is in game-server/app/servers/gate/handler/gateHandler.js, as follows:
handler.queryEntry = function(msg, session, next) {
  var uid = msg.uid;
  // ...
};- Connector server accepts and manages connections from clients and maintains the sessions. Its business logic code is in game-server/app/servers/connector/handler/entryHandler.js, as follows:
handler.enter = function(msg, session, next) {
  var self = this;
  var rid = msg.rid;
  var uid = msg.username + '*' + rid
  var sessionService = self.app.get('sessionService');
  // .....
};- Chat server handles chatting request and maintains channel information. A chat room can be treated as a channel and there are multiple users in a channel. When a user initiates a speaking, chat server will broadcast it to the users in the same channel. Chat server also provides remote service for connector server to handle user joining and leaving, so chat server has not only handler definition, but also remote definition too, as follows:
// chatHandler.js
handler.send = function(msg, session, next) {
  var rid = session.get('rid');
  var username = session.uid.split('*') [0];
  // .....
};

// chatRemote.js
chatRemote.prototype.add = function(uid, sid, name, flag, cb) {
  var channel = this.channelService.getChannel(name, flag);
};

chatRemote.prototype.kick = function(uid, sid, name) {
  var channel = this.channelService.getChannel(name, false);
  // ...
};
All the configuration information is in game-server/config directory. Here, we only concern on servers.json, master.json. master.js is used to configure the master server, including host and port, while servers.json is used to configure the application servers.
For iOS development, you need to use the chatofpomelo without the websocket:
$ git clone https://github.com/NetEase/chatofpomelo.git
and this client will work with this server. It won't work with the chatofpomelo-websocket server.
$ git clone https://github.com/NetEase/chatofpomelo.git
In this section, we obtain a simple chat application and make it run, and briefly analyze its source code. To keep simple, we only configure one server for each server type.
Next, we will configure multiple servers for each server type in order to demonstrate how to scale the application based on pomelo out.